Today we discuss about Sitecore Sidekick –
Content Migrator which is useful for migrate content or sync content from
another server.
For this follow below links:
For install in solution:
or run below nugget command:
Install-Package SitecoreSidekickCore
-Version 1.0.0
After install the module update the server list from zSCSContentMigrator.config
file under
<servers hint="raw:BuildServerList">
<server>[enter
server 2 url here i.e. https://sitecore-dev]</server>
</servers>
In this list fill the hostname of server from which
you want to pull sitecore content.
Now follow these below steps:
Step 1:
Select
a server. A white list of servers is configured in the content migrator
config file. Keep in mind that the target server also needs to have the
content migrator installed on it.

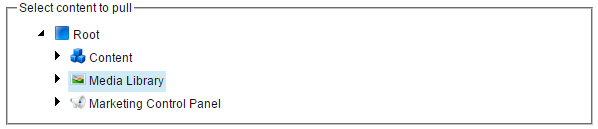
Step 2:
Select
an item. Select the main item to be pulled over from the remote server.
Step 3:
Configure
options for your operation.
1. Migrate all children
of selected item.
1. You would
uncheck this option if you only wanted a single item.
2. Overwrite all existing
content with new content from the server.
1. You would uncheck this
option if you had content on the local server that you would rather not have
deleted but you wanted to gather all new content items.
3. If parent doesn’t
exist locally add that too.
1. You would uncheck this
option if you only wanted the selected item or it’s children.
4. Make the local content
tree mirror the remote content tree.
1. You would check this
option if you wanted to get rid of all local content in favor for the content
from the target, this would commonly be the case if you wanted to overwrite QA
or Dev content with production content and dispose of the clutter.

Step 4:
Configure
advanced sitecore options.
1. Run using the event
disabler.
1. Unchecking this option
will make all events run when installing, moving, deleting, etc.. Items.
This can slow down the operation but if you have lots of important custom
on save events, it might be important.
2. Checking this option
will eliminate all events, this can greatly increase speed on installation.
2. Run using the bulk
update context.
1. Unchecking this option
will make the operation run without the bulk update context. This makes
it update the search indexes for each operation, as well as likely other side
processes (it’s kind of a black box, if anyone can clarify further please
comment).
2. Checking this option
will make the operation skip all index updates. This is a good idea if
you’re updating a lot of content at one time, just don’t forget to run an index
rebuild when you’re done.

Step 5:
Select
your operation type
1. Pull – Execute the
operation immediately.
2. Preview – Execute an
estimation of the results where no actual changes are made. Note that
this isn’t 100% accurate as some insertion operations could result in
unforeseen errors.
