Showing posts with label sitecore. Show all posts

Tuesday, September 22, 2026

Building a Custom Sitecore MCP Server in .NET — Tailored for Real Project Work

Hello Sitecorian Community! 👋

This is the blog I have been building toward across the whole series. Blogs 1–3 covered the foundations — understanding MCP, building a minimal .NET server, and setting up Anton Tishchenko’s community server against a live XP instance. All of that was preparation for this: building something genuinely mine, shaped around the actual work I do every day on a Sitecore project.

The Problem I Wanted to Solve

When I started thinking about what to build, the answer came quickly — because the pain was already obvious.

On every Sitecore project I have worked on, there is a category of work that is critical but relentlessly repetitive: managing Content Security Domain (CSD) role access. CSD is Sitecore’s standard security model for controlling which roles can read, write, rename, create, delete, or administer content nodes in the content tree.

On the surface it sounds simple — give a role access to a path. In practice, on an active project with multiple content authors, developers, and client stakeholders all requesting access at different points, it turns into a constant stream of small but time-consuming tasks.

The Before: A Manual, Repetitive Grind

Here is what the daily reality looked like before this server existed.

Every request followed the same path through the Sitecore Security Editor:

  1. Open the Security Editor in the Sitecore Content Editor
  2. Search for the role by name — sounds trivial, but role names across multiple domains (sitecore\, cog\, client-specific) are easy to get wrong, especially for roles you don't work with daily
  3. Navigate to each content node — sometimes a single path, often multiple paths (content root + media library root for the same site)
  4. Tick the correct permission type — CSD access (Read + Write) or CSD Admin (6 rights), with inheritance enabled so child items pick it up
  5. Repeat for every path in the request — a single request often covers 2–4 paths
  6. Repeat the whole thing for every role — some requests cover multiple roles at once
  7. Verify the rules were applied correctly and propagated as expected

The hidden cost: this work required a developer. It was not something a BA or project manager could safely do through the Sitecore UI. Every request became a ticket, a context switch, an interruption to actual development work — adding zero feature value, carrying real risk of human error.

Figure 1 — The same CSD access request: a 5-step manual process taking 15–20 minutes vs a single natural language prompt taking under 1 minute
Figure 2 — Developer hours spent on CSD access management. The onboarding scenario (30–40 requests) sees the greatest saving: 5+ hours to ~45 minutes

The After: Natural Language + MCP

With the Sitecore MCP Server connected to VSCode, the same work now looks like this:

I need to set up CSD access for the "cgdev" team on the DemoSite.

1. Search for Sitecore roles matching "cgdev" to find the exact role names.
2. Grant CSD access (Read and Write) for the found roles on:
- /sitecore/content/DemoSite
- /sitecore/media library/DemoSite
3. Also grant CSD Admin access to any role matching "cgadmin" on the same paths.

GitHub Copilot in agent mode chains the tool calls in sequence — search, then grant, then confirm — and summarises the result. The whole thing takes under a minute. No Security Editor. No navigation. No repeated clicking across paths and roles.

The CSD Tools — Five Tools That Changed My Daily Workflow

The server exposes five tools specifically for CSD role access management. Here is each one in detail.

Figure 3 — Grant flow (top) and revoke flow (bottom). Both start with SearchCsdRole to confirm the exact identity. The no-Deny constraint in the revoke tools is enforced in code — not a prompt instruction

SearchCsdRole — Find the exact role identity first

Before granting or revoking access, you need the exact role identity string — including the domain prefix. On a real project with multiple domains (sitecore\, cog\, client-specific), guessing is error-prone.

This tool searches across all Sitecore domains by partial name match and returns the exact identities.

Search for Sitecore roles matching the name "cgdev".

Returns results like sitecore\cgdev, cog\cgdeveloper — whichever match. You pass those exact strings to the grant or revoke tools. This one step alone eliminates a common class of access mistakes.

GrantCsdAccess — Read + Write with inheritance

Grants CSD access (Read and Write) to one or more roles across one or more content paths. All rules apply with PropagationType Any, meaning they inherit to all child items automatically.

Grant CSD access for the role "sitecore\cgdev" on the following paths:
- /sitecore/content/DemoSite
- /sitecore/media library/DemoSite

You can also pass multiple roles at once. What used to be 4 separate Security Editor operations — 2 roles × 2 paths — is now one prompt.

Safety behaviour: paths that do not exist in Sitecore are reported as PathNotFound and skipped. The tool never silently fails and never applies partial access without telling you.

GrantCsdAdminAccess — Full admin rights with inheritance

Grants full CSD Admin access — Read, Write, Rename, Create, Delete, and Administer — with inheritance. Used for roles that need full editorial control over a site section, not just content authoring. Previously this required manually ticking six checkboxes per role per path in the Security Editor — easy to miss one under time pressure.

Grant CSD Admin access to the role "sitecore\cgadmin" on /sitecore/content/DemoSite 
and /sitecore/media library/DemoSite.

RevokeCsdAccess — Remove Read + Write safely

Removes CSD Read and Write Allow rules from roles on specified content paths. Designed for offboarding team members or restructuring access when a content section is reorganised.

Revoke CSD access for "sitecore\cgdev" on /sitecore/content/DemoSite 
and /sitecore/media library/DemoSite.

The most important design decision in this tool: it reads the item’s explicit ACL, filters out only the target Allow entries for the specified role, and resets the ACL with those entries removed. No Deny rules are ever written. A mistake during a revoke operation should never lock someone out of Sitecore content unexpectedly. This constraint is enforced in code — it cannot be overridden by a prompt.

If a role had no rules on an item, the tool reports RulesRevoked: 0 for that path and continues. It never fails silently.

RevokeCsdAdminAccess — Remove all 6 admin rights safely

Same safe revoke behaviour, but targets all six CSD Admin rights. Used when a role is being downgraded from admin to standard CSD access, or fully removed from a section.

Revoke all CSD Admin permissions for "sitecore\cgadmin" on /sitecore/content/DemoSite.

CSD Access Rights Reference

Figure 4 — CSD grants Read + Write. CSD Admin grants all 6 rights. Both propagate to all descendants automatically

How the CSD Tools Work Under the Hood

The CSD tools build inline SPE (Sitecore PowerShell Extensions) scripts at call time and execute them through the same PowerShell remoting client used by the RunSitecorePowerShellScript tool.

  • Role searches use Get-Role -Filter with the partial name you provide
  • Access grants use New-ItemAcl and Add-ItemAcl with PropagationType Any
  • Access revokes read the item’s full explicit ACL, filter out the target Allow entries for the specified role, and apply the cleaned ACL back with Set-ItemAcl — no Deny rules are ever constructed or written

The Time Saving — In Real Numbers

Across a normal working week, that is roughly 8–10 hours of developer time moving from access management back to actual development work.

The Other Tools in the Server

Figure 5 — All 8 tools across 4 areas. CSD tools are the most project-specific; GraphQL, Item Service, and PowerShell cover broader daily Sitecore interactions

QuerySitecoreGraphQl

Run any GraphQL query against a Sitecore schema (edge, master, core). Handles the HTTP POST with the sc_apikey header. Supports variables and schema introspection.

Query the Sitecore Home item via GraphQL using the path /sitecore/content/Home in English.

Run a Sitecore GraphQL introspection query to list all available types on the edge schema.

GetSitecoreItemByPath

Retrieve a Sitecore item and all its fields by content tree path using the Item Service API (SSC). Supports any database and language.

Get the Sitecore item /sitecore/content/Home from the web database and tell me 
if it has been published — check the __Updated field.

RunSitecorePowerShellScript

Execute any script via SPE remoting — the most open-ended tool in the set. Copilot constructs the script from your intent, or you write it yourself.

Run a Sitecore PowerShell script to get all direct children of /sitecore/content/Home 
and return their Name, ID, and TemplateName as JSON.

Run a Sitecore PowerShell script to clear all Sitecore caches on the CM server.

Program.cs — How It All Wires Up

using Microsoft.Extensions.DependencyInjection;
using Microsoft.Extensions.Hosting;
using Microsoft.Extensions.Logging;

var builder = Host.CreateApplicationBuilder(args);
// All logs to stderr - stdout is reserved for MCP protocol messages
builder.Logging.AddConsole(o => o.LogToStandardErrorThreshold = LogLevel.Trace);
builder.Services
.AddMcpServer()
.WithStdioServerTransport()
.WithTools<GraphQlTools>()
.WithTools<ItemServiceTools>()
.WithTools<PowerShellTools>()
.WithTools<CsdAccessTools>();
await builder.Build().RunAsync();

Each tool class registered independently with .WithTools<T>(). Adding a new tool category is one line.

Prerequisites

  • .NET 8 SDK
  • Sitecore XP or XM CM instance with GraphQL endpoint enabled, Item Service (SSC) enabled, and SPE installed with remoting enabled

Getting Started

git clone https://github.com/gaurarun777/sitecore-mcp.git
cd sitecore-mcp

Open in VSCode — the .vscode/mcp.json prompts for all credentials interactively when the server starts. Nothing sensitive is hardcoded.

⭐ github.com/gaurarun777/sitecore-mcp

Key Lessons from Building This

Design safety into the tool, not into the prompt

The no-Deny-rules constraint in the CSD revoke tools is enforced in code. It cannot be overridden by any prompt. On tools that touch access control, safety behaviour belongs in the implementation — not in hoping the caller remembers the right instruction.

Search before act

The SearchCsdRole tool exists for a reason. Role names across multiple Sitecore domains are easy to misremember. Searching first and confirming the exact identity before granting or revoking is the difference between a clean operation and an access mistake that takes time to diagnose and fix.

Repetitive work is the right first target

The CSD tools did not replace complex, high-judgment Sitecore development work. They replaced work that was clearly repetitive, time-consuming, and low-judgment — the kind where the value is accuracy and speed, not deep thinking. That is always the right first target for any automation.

One prompt can chain multiple tool calls

Copilot in agent mode chains tool calls automatically. You do not need to build orchestration into the server. Design tools to be focused and single-purpose — let the AI chain them together in response to a compound prompt.

The Full Journey

When I sat in that SUGCON India 2026 session, I wasn’t thinking about access management scripts. But when I looked at where developer time was actually going on the project, the answer was obvious. The MCP server did not solve an interesting engineering problem — it solved a real, daily, expensive one.

That is probably the most useful thing you can build.

Till then, Happy Sitecoring! 😊

References:
github.com/gaurarun777/sitecore-mcp
Microsoft Learn — Build MCP Server with C#
Flux Digital — Sitecore MCP Server with XP + VSCode & CoPilot
Anton Tishchenko — mcp-sitecore-server (GitHub)
SUGCON India 2026 — sitecoreknowledgeshare.blogspot.com
Monday, August 3, 2026

Connecting Sitecore XP to Your IDE via MCP — With VSCode and GitHub Copilot

Hello Sitecorian Community! 👋

Blog 2 gave me the working mental model for MCP. Now it was time to point that knowledge at something real: a live Sitecore XP instance, from inside VSCode, through GitHub Copilot.

While exploring what the community had already built, I came across an excellent guide from the Flux Digital team:

📄 Setting Up Sitecore MCP Server with XP + VSCode & CoPilot — Flux Digital

This is based on Anton Tishchenko’s open-source Sitecore MCP server:
📦 github.com/Antonytm/mcp-sitecore-server (released May 2025)

I’m going to walk through the full setup here with additional context from my own experience along the way.

What this server gives you access to

Once connected, your IDE can interact with a running Sitecore XP instance for:

  • Content item operations — read, create, and update items
  • User, domain, and role management
  • Search index control — rebuild, status checks
  • Databases, caches, and log access

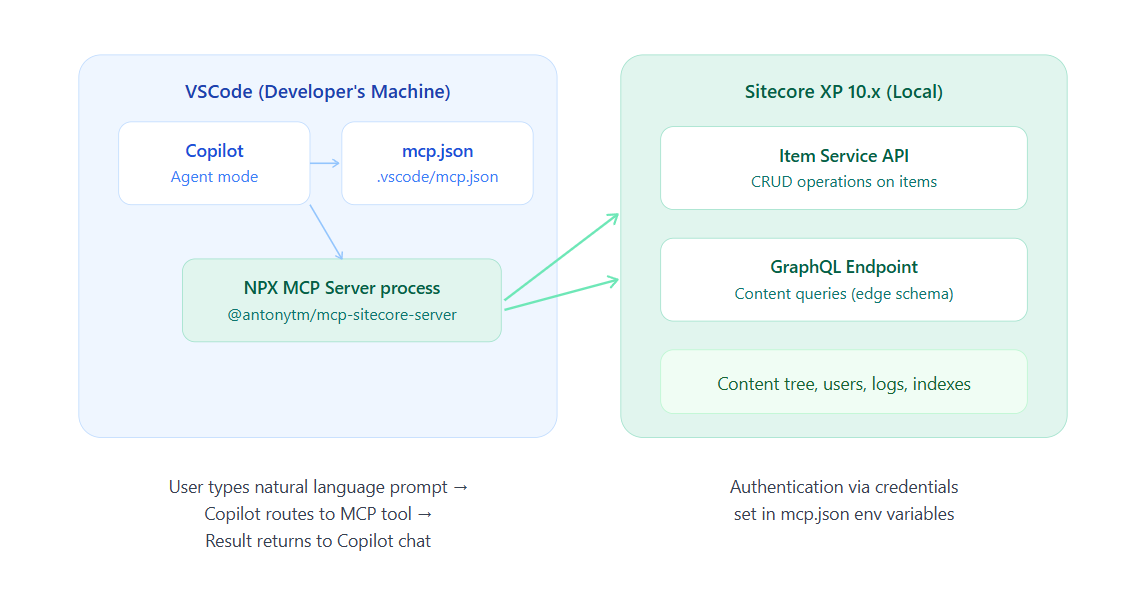
The full architecture of this setup


Full architecture of the Sitecore MCP setup. VSCode reads the mcp.json config to launch the server process via NPX, which then authenticates and queries the local Sitecore XP instance

Prerequisites

  • Sitecore XP 10.x installed locally (the Flux Digital guide uses 10.4)
  • Node.js and NPX installed on your machine
  • GraphQL configured on your Sitecore instance with the Item API enabled
  • VSCode with the GitHub Copilot extension

Step-by-step setup

  1. Create your MCP configuration fileIn a .vscode folder at the root of your Sitecore project, create a new file named mcp.json:
{
"servers": {
"Sitecore Local": {
"type": "stdio",
"command": "npx",
"args": ["@antonytm/mcp-sitecore-server@latest"],
"env": {
"TRANSPORT": "stdio",
"GRAPHQL_ENDPOINT": "https://<your-sc-hostname>/sitecore/api/edge/graphql",
"GRAPHQL_SCHEMAS": "edge,master,core",
"GRAPHQL_API_KEY": "{YOUR-API-KEY-GUID-HERE}",
"ITEM_SERVICE_SERVER_URL": "https://<your-sc-hostname>",
"ITEM_SERVICE_DOMAIN": "sitecore",
"ITEM_SERVICE_USERNAME": "admin",
"ITEM_SERVICE_PASSWORD": "yourpassword"
}
}
}
}


Update every value to match your local Sitecore instance — hostname, API key, and credentials.

2. Start the MCP server

Open the mcp.json file in VSCode. A 

Start

button appears inline at the top of the file — click it. VSCode launches the server as a background process via NPX, downloading the package on the first run. Monitor the output in the VSCode 

Output 

panel to confirm it started cleanly.

3. Switch Copilot to Agent mode and verify the connection

Open GitHub Copilot in VSCode and switch to

Agent

mode. Click the 

tool icon

at the bottom of the Copilot panel. Scroll through the list — your Sitecore Local server should appear with its tools registered beneath it. If it doesn’t show up, restart VSCode, reopen Copilot, and click the tool icon again.

4. Test the connection

Type the following prompt in Copilot agent mode:

  • Test Sitecore MCP connection works by bringing back the default home item from Sitecore

Copilot will ask permission before running — click

Continue

If the connection is working, you’ll see your Sitecore Home item data come back directly inside the Copilot response. That moment is genuinely satisfying.

Alternative: clone and run via NPM instead of NPX

If you prefer not to rely on NPX fetching the package on demand, you can clone and run the server directly:

git clone https://github.com/Antonytm/mcp-sitecore-server.git
cd mcp-sitecore-server
npm install
npm run build
npm start

Solving common issues

Too many tools error (on a free Copilot account)

Go to the tool icon in Copilot and deselect the default built-in tools, leaving only the Sitecore MCP Server tools active. Free tier accounts have a tool limit per request.

TLS / connection error connecting to local Sitecore

Add the following to the env section of your mcp.json:

"NODE_TLS_REJECT_UNAUTHORIZED": "0"

⚠️ Important: Only use NODE_TLS_REJECT_UNAUTHORIZED: "0" for local development instances. Never use this setting for remote or production servers.

Item API not responding

Your local Sitecore instance may need a config patch to allow HTTP access for the Item Service. You need to set Sitecore.Services.AllowToLoginWithHttp to true and configure the appropriate security policy. The full config patch XML is in the Flux Digital guide.

What this stage proved

By the end of this setup, I had GitHub Copilot in my IDE talking directly to a local Sitecore XP instance — browsing items, querying content, checking data — all through natural language prompts. No Content Editor. No manual navigation. Just a prompt and a result.

It worked well. But I noticed that Anton’s server was a general-purpose Sitecore administration tool. What I actually wanted was something more focused — tools shaped around my specific daily reporting needs on a real project. That is what Blog 4 is about.

Till then, Happy Sitecoring! 😊

Monday, July 20, 2026

Your First MCP Server in .NET — From Zero to Hello Tool


Hello Sitecorian Community! 👋

Before building anything Sitecore-specific, I needed to understand MCP from the ground up. Jumping straight to a Sitecore integration without that foundation would mean debugging two things at once — the Sitecore layer and the MCP layer. That is a reliable recipe for confusion.

So step one was this: build the smallest possible working MCP server in .NET, connect it to GitHub Copilot, and see a single tool call succeed. That mental model turned out to be everything that followed.

The guide I followed was Microsoft’s official quickstart:
📘 Create a minimal MCP server using C# — Microsoft Learn

Understanding the project structure first

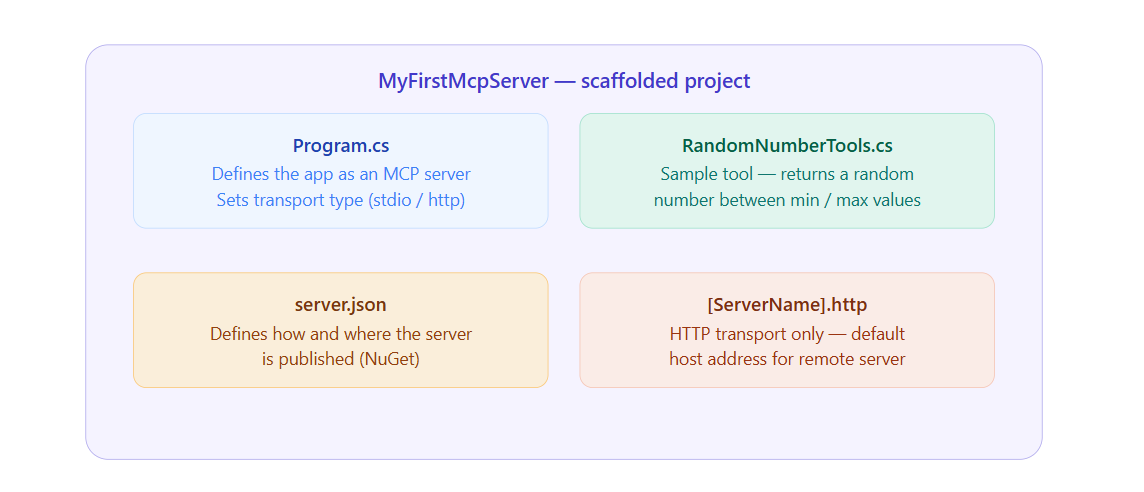
Before diving into the steps, it helps to understand what a .NET MCP server project actually contains. The template generates four key files:

MyFirstMcpServer — scaffolded projectProgram.csDefines the app as an MCP serverSets transport type (stdio / http)RandomNumberTools.csSample tool — returns a randomnumber between min / max valuesserver.jsonDefines how and where the serveris published (NuGet)[ServerName].httpHTTP transport only — defaulthost address for remote server

The four files generated by the MCP Server App template. Program.cs and the tools file are the two you'll spend most time in

Prerequisites

  • .NET 10.0 SDK — required; the MCP project templates won’t install on earlier versions
  • Visual Studio Code
  • C# Dev Kit extension for VSCode (ms-dotnettools.csdevkit)
  • GitHub Copilot extension for VSCode (GitHub.copilot)
  • A NuGet.org account — only if you want to publish; skip for local experiments

Note: The Microsoft.McpServer.ProjectTemplates package is currently in preview. It works well, but always check the official docs for the latest before you start.

Step-by-step setup

Step-by-step setup

  1. Install the MCP Server project templateOpen a terminal and run:
dotnet new install Microsoft.McpServer.ProjectTemplates

This adds the MCP Server Apptemplate to your .NET tooling. You won’t see it in the project list until this step is done. .NET 10.0 SDK or later is required.

2. Create the project in VSCode

Open VSCode and bring up the Command Palette (Ctrl+Shift+P on Windows/Linux, Cmd+Shift+P on Mac). Type .NET: New Project and select it. In the template list that appears, search for

MCP Server App and select it. Choose a location, give your project a name — I used MyFirstMcpServer — and press Enter.

3. Choose your template optionsYou’ll be prompted to configure:

  • Framework: Select .NET 10
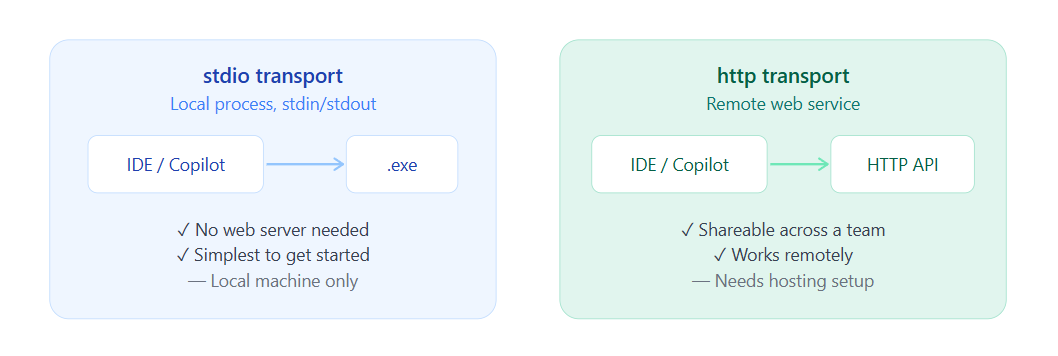
  • Transport type: Choose stdio(local process) for your first experiment. It communicates via standard input/output and needs no web hosting setup. 
  • Choose http only if you need a remotely accessible server
  • Native AOT / Self-contained: Leave as defaults for now

4. Read the scaffolded code before changing anything

VSCode opens your new project. Spend five minutes reading through Program.cs and RandomNumberTools.cs before modifying anything. The template gives you a working server with a sample tool already registered. That structure — the attribute decoration, the description, the method signature — is the pattern you will repeat for every tool you build later.

5. Connect Copilot and test a tool call 

Open GitHub Copilot in VSCode and switch it to Agent mode. 

Click the tool icon at the bottom of the Copilot panel. Your MCP server should appear in the list of available tools. If it doesn’t, restart VSCode and try again. Once it appears, type a prompt that exercises the sample tool. Copilot will ask permission to run it — click Continue. When you see the tool execute and return a result inside the Copilot response, you have done it.

6. Update PackageId if publishing to NuGet (optional)

If you want to publish your server as a NuGet package, update the <PackageId> in your .csproj to something unique:

<PackageId>YourNuGetUsername.SampleMcpServer</PackageId>

Not required for local use.

What the transport types actually mean

stdio transportLocal process, stdin/stdoutIDE / Copilot.exe✓ No web server needed✓ Simplest to get started — Local machine onlyhttp transportRemote web serviceIDE / CopilotHTTP API✓ Shareable across a team✓ Works remotely — Needs hosting setup

stdio vs http transport. For a first experiment, stdio is the right choice. Switch to http when you need to share the server across a team or access it remotely

Three things this exercise taught me

Tools are the entire model. An MCP server is a collection of tools. Each tool has a name, description, typed inputs, and a return value. The AI model reads those descriptions to decide which tool to call. That is the whole protocol — no magic underneath.

The transport layer is a deployment decision, not a logic decision. stdio vs http changes how clients connect to your server. The tools themselves work identically in both modes. Start with stdio locally; reach for http when you need remote access or team sharing.

Clear descriptions drive reliable routing. In the sample tool, the description is short and precise. I learned the hard way later that vague descriptions cause the AI to call the wrong tool or ignore it entirely. Write descriptions as if you are explaining to a teammate what this function does and when exactly to use it.

Quick tip: after getting the sample tool working, try modifying the RandomNumberTools.cs description to something vague, then ask Copilot the same prompt. You will see immediately how much description quality affects routing reliability.

Till then, Happy Sitecoring! 😊

Tuesday, July 14, 2026

MCP — The Protocol the Sitecore Community Is Talking About

Hello Sitecorian Community! 👋

If you have been following Sitecore community conversations lately, one acronym keeps coming up: MCP. If you have heard the term but not yet found time to dig into it properly — this four-part series is for you.

I have already written a full recap of SUGCON India 2026 in Delhi — the announcements, the sessions, the community energy. I will not repeat all of that here. But one topic from those two days sent me down a rabbit hole I haven’t climbed out of since, and that is what this series documents.

That topic was Model Context Protocol — MCP.

So what actually is MCP?

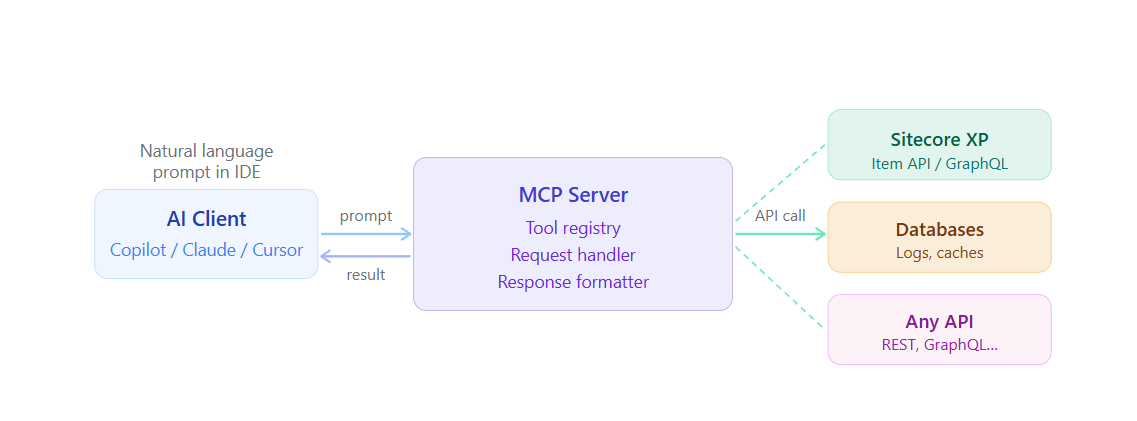
MCP — Model Context Protocol — is an open protocol that defines how AI models communicate with external tools and data sources in a structured, standardised way. The core shift it represents is this: instead of an AI assistant only being able to chat, it can also act — querying systems, reading live data, triggering operations — through a defined interface.

Think of it as a universal adapter between your AI client and any external system. The AI model discovers available tools, reads their descriptions, and calls them in response to a natural language prompt. No hardcoded API client code. No custom integration per tool. One protocol, any system that implements it.

AI ClientCopilot / Claude / CursorpromptMCP ServerTool registryRequest handlerResponse formatterresultAPI callSitecore XPItem API / GraphQLDatabasesLogs, cachesAny APIREST, GraphQL…Natural languageprompt in IDE

 MCP high-level flow: a natural language prompt triggers the MCP client, which routes through the server to the target system and returns structured results

The three things that make MCP relevant for Sitecore developers right now

1. Sitecore’s own direction

At SUGCON India 2026, Sitecore announced Marketer MCP powered by Agent API — the ability to access Sitecore marketing capabilities directly through AI environments like Claude, Cursor, and other LLM-powered tools. This is not a roadmap item. It is Sitecore signalling that MCP is a first-class integration path.

2. The community built it first — for XP

In May 2025 — before the SUGCON announcement — community contributor Anton Tishchenko released an open-source Sitecore MCP server on GitHub: github.com/Antonytm/mcp-sitecore-server. This server connects to Sitecore XP via the Item Service API and GraphQL, and exposes tools for content operations, user and role management, index control, and database and log access. The community did not wait for an official product — it built the bridge itself.

3. The .NET angle for developers like me

Microsoft published an official quickstart for building MCP servers in C# using the C# SDK for MCP. The same language stack we use for Sitecore development is now a first-class way to build AI tooling. That alignment made experimentation feel natural rather than foreign.

What MCP actually enables — in practical terms

Without MCP, an AI assistant in your IDE can only work with the code in front of it. With an MCP server connected to your Sitecore instance, it can also:

  • Browse the content tree and retrieve specific items
  • Check the publishing queue without opening the Sitecore admin
  • Query workflow states across a template type
  • Check which items are currently locked and by whom
  • Read logs and surface errors without leaving your editor

All of this through a natural language prompt. No tab-switching, no manual navigation, no copy-pasting item IDs.

Why this matters more than it sounds: Sitecore developers already know their IDE. The friction of context-switching to a browser, logging into the admin UI, navigating to the right screen — that adds up across a working day. MCP removes that friction without changing the way Sitecore works.

How MCP tools work — a closer look

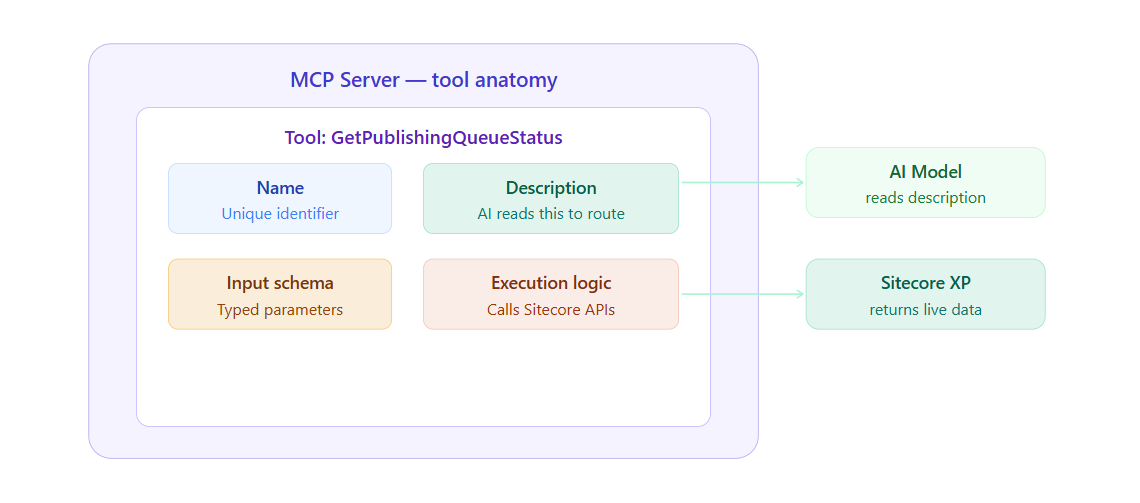
Every MCP server is essentially a collection of tools. Each tool is a named function with a description and typed inputs. The AI model reads those descriptions to decide which tool to call when responding to a prompt.

MCP Server — tool anatomyTool: GetPublishingQueueStatusNameUnique identifierDescriptionAI reads this to routeInput schemaTyped parametersExecution logicCalls Sitecore APIsAI Modelreads descriptionSitecore XPreturns live data

Anatomy of a single MCP tool. The AI reads the description to decide whether to call the tool; the execution logic does the actual work against Sitecore

What is coming in this series

BlogWhat it coversBlog 1 (this one)What MCP is, why it matters for Sitecore developers, and the landscapeBlog 2Building a minimal MCP server in .NET using Microsoft’s official C# quickstartBlog 3Setting up Anton Tishchenko’s community Sitecore MCP server for XP with VSCode and CopilotBlog 4Building a custom .NET MCP server tailored to real Sitecore project reporting needs

If you are a .NET developer working on Sitecore and curious about where AI tooling is heading — stick around. The barrier is genuinely lower than it looks.

Till then, Happy Sitecoring! 😊

Monday, June 8, 2026

SUGCON India 2026 — My Key Takeaways from Two Days in Delhi


Hello Sitecorian Community,

SUGCON (Sitecore User Group Conference) India 2026 just wrapped up in Delhi on June 4–5, and what an incredible two days it was!

If you couldn’t make it this year, or if you attended and want a structured recap of everything that happened — this post is for you. I’m going to walk through the biggest announcements, the sessions that stood out, and what I personally think you should be paying attention to as a Sitecore practitioner right now.

Let’s dive in. 🚀

🔷 The Big Announcement: Sitecore vNext

If there was one topic that had every room buzzing at SUGCON India 2026, it was Sitecore vNext.

The next major evolution of the Sitecore Platform DXP is officially on the horizon — and here’s what makes it genuinely exciting: it’s not the kind of “upgrade” that forces you to rewrite everything overnight.

What we know about vNext so far:

  • Built on a modern .NET foundation, fully aligned with Microsoft’s long-term roadmap
  • Uses the Strangler Fig pattern for gradual modernization — you adopt new capabilities at your own pace, alongside your existing implementation
  • No forced migrations, no massive rewrites
  • AI-powered authoring experiences built in from the start
  • A refreshed Content Editor and Experience Editor experience
  • Support for Windows Server 2025, SQL Server 2025, Solr 10, and .NET 10
🔥 What really got the room talking: The Strangler Fig approach means organisations can introduce vNext capabilities gradually — running them alongside what they already have, and transitioning components when the time is right for them. That’s a massive shift from the traditional “big bang” upgrade model Sitecore customers have been used to.

And the bridge to get there? Sitecore 10.5.

Sitecore 10.5 is the next stepping stone and it’s already delivering AI-powered authoring capabilities as a preview of what vNext will bring at scale.

✅ Three Things You Can Start Doing Right Now

  1. Build clean separation between your Sitecore implementation and custom code — this is what makes the Strangler Fig approach actually work
  2. Stay current — 10.4 and 10.5 are key modernization milestones, don’t fall behind
  3. Invest in automation — DevOps pipelines, CI/CD, and regression testing will be your best friends during any gradual migration

🔷 AI Is Moving From Buzzword to Engineering Discipline

This was the theme that ran through almost every technical session at SUGCON India 2026: AI has moved out of the slide deck and into the codebase.

The conversations weren’t about whether to use AI. They were about how to engineer with it properly.

Two sessions stood out here in particular.

Building AI-Powered Migration Engines with MCP

The Model Context Protocol (MCP) is enabling a genuinely new class of developer tools. Sessions at SUGCON showed teams using MCP to build migration engines that dramatically cut the time and risk of moving content and configurations across Sitecore environments.

What used to be weeks of careful manual work is being transformed into guided, AI-assisted workflows. For anyone who has managed a large content migration on a Sitecore project — you’ll understand just how significant that is.

Building Hallucination-Safe AI Assistants

This was one of the most practically useful sessions of the conference.

Building AI assistants on top of a DXP is only valuable if those assistants can be trusted. Speakers walked through architectural patterns for:

  • Grounding AI responses in verified, approved content sources
  • Implementing guardrails that prevent out-of-scope or incorrect responses
  • Designing systems that fail gracefully — rather than confidently generating wrong answers
⚠️ Key insight from this session: The shift isn’t just about adding AI to your implementation. It’s about treating AI as an engineering discipline with proper reliability, testing, and governance built in from day one.

🔷 XM Cloud and Headless: Maturing Faster Than You Might Think

For developers in the headless space, the XM Cloud and Next.js sessions offered some of the most immediately actionable content of the two days.

The state of headless Sitecore in mid-2026 is genuinely more mature than it was even 12 months ago. Sessions covered:

  • Next.js performance optimization for Sitecore-powered sites — tackling real-world bottlenecks around rendering strategies, edge caching, and ISR/SSR tradeoffs
  • Composable DXP architecture patterns that are proving out at scale in production environments
  • Developer experience improvements in XM Cloud — local development tooling, component scaffolding, and how teams are structuring their headless codebases for maintainability

The clearest signal from these sessions: headless isn’t the “advanced” or “optional” approach anymore. It’s becoming the default, and the ecosystem tooling around it is catching up fast.

✅ Tip: If you’re still on a traditional Sitecore rendering model and haven’t started exploring a composable path yet, now is the time to start. The XM Cloud ecosystem is ready.

🔷 The Community: Still What Makes SUGCON Special

I’d be doing a disservice to the conference if I only talked about the technology.

What makes SUGCON India genuinely different from any other enterprise tech event is the people — and the culture of openness they’ve built together. Sitecore MVPs, architects, developers, and product leaders all in the same space, sharing knowledge freely, asking hard questions, and genuinely helping each other figure things out.

This edition had a particularly meaningful moment: a heartfelt farewell to Tamas Varga, whose energy and vision have shaped the SUGCON community for years. And a warm welcome to Sebastian Winter, stepping into his new leadership role — wishing him the very best as he continues building on that momentum.

A huge shoutout to the organizing committee who made this all happen in Delhi:

Sakshi Khurana, Sean Broderick, Rob Earlam, Hardeep Bhamra, Vikas Kumar, Yamini Punyavathi Muttevi, Raman Gupta — and every volunteer and sponsor who contributed behind the scenes.

And to the sponsors — Horizontal Digital, Altudo, Arroact Technologies, BIZTECHNOSYS, Codehouse, EPAM Systems, and Techxot — thank you for supporting the community.

🔷 My Personal Takeaways — What I’m Doing Differently Now

Here’s what I’m taking back to the desk and actually acting on:

On vNext and platform modernization: Start getting familiar with the Strangler Fig approach now — don’t wait for a migration to be forced. Understanding the pattern early means you can start shaping your current implementation to support it.

On AI: Move past experimentation. If you’re building anything with AI in the Sitecore space, invest in understanding MCP and hallucination-safe design patterns. The maturity bar for production AI implementations is rising quickly.

On headless and XM Cloud: If you haven’t started the composable journey yet, the ecosystem is ready for you. The tooling, patterns, and community knowledge are all there now.

On community: Show up. Whether at SUGCON, local Sitecore user groups, or online forums — the knowledge shared in this community is one of the most underrated resources in the Sitecore ecosystem, and it only works because people contribute to it.

Wrapping Up

SUGCON India 2026 was a reminder that the Sitecore ecosystem isn’t standing still. vNext signals a platform team that has listened carefully to years of community feedback and is building for the next decade — not defending the last one.

The combination of modern .NET foundations, AI woven thoughtfully into the platform, and a maturing headless ecosystem makes the next 12–18 months a genuinely exciting time to be working in this space.

I hope this recap was useful — whether you attended and want to consolidate your notes, or you couldn’t make it and wanted a proper rundown of what happened.

Stay tuned for more Sitecore articles, tips, and deep-dives right here on the blog.

Till then, Happy Sitecoring! 😊

Did you attend SUGCON India 2026? What was your biggest takeaway? Drop it in the comments below — I’d love to hear from you!


AI Personalization and Governance in SitecoreAI — What We Got Wrong First, and How We Fixed It

Hello Sitecorian Community,

If you have set up personalization on a SitecoreAI project, you’ve probably come across a situation like this a few months after go-live:

“Our personalization is configured. Decision models are deployed. But the analytics show variants are serving to only 4–5% of sessions. Everything else is hitting the fallback experience.”

And separately, when AI-generated content first goes into a governance review:

“If the AI produces something incorrect or off-brand — who is responsible for catching it, and what is the process for fixing it?”

Both of these come up on almost every enterprise SitecoreAI project. They look like different problems, but they have the same root cause: teams move to implementation before fully understanding how the underlying system works.

In this post I want to cover what we got wrong with personalization first, how we fixed it, and then walk through the governance setup that addresses the second question properly.

The Real Problem With Personalization Underperforming

The first thing worth clarifying — because there is a lot of confusion about this:

Sitecore Personalize decision models are primarily rules-based, not machine learning models that train automatically from your visitor traffic.

They are built on the DMN (Decision Model and Notation) standard. You define conditions, decision tables, and business logic on a visual canvas. Decision models should run in under 200ms — going beyond that risks impacting the visitor experience. This is a hard limit to design to, not a guideline. (Source: Fishtank practitioner implementation guide, confirmed by community implementations.)

Machine learning is available through optional Analytical Model components, but these connect to external propensity or forecast models that you supply via REST API. Sitecore does not auto-train models from your site’s visitor data. You bring the model; Sitecore Personalize calls it.

This matters because the most common mistake we see is teams building complex decision models and then assuming they need more traffic data before they work. In most cases, that is not the problem at all.

Why Variants Were Serving to Only 5% of Sessions

In our experience, low variant serving rates almost always trace back to one of three specific things:

  • Conditions are too narrow. The decision rules don’t match enough real visitor profiles to fire. Teams write conditions based on ideal visitor segments, not how real visitors actually arrive on the site.
  • Guest profiles are missing session event data. The conditions reference behavioral data — page views, interactions, past purchases — but that data was never captured because the Cloud SDK was not set up correctly from day one.
  • The Cloud SDK initialised too late. Behavioral events from the visitor’s first interactions never reached CDP, so there was nothing for the decision model to work with.

⚠️ The step most teams skip: Sitecore’s own best practices documentation recommends running a decision discovery workshop before building anything — bringing together analysts, architects, marketers, and data leads to define the expected outcome, the required input data, and the decision logic. Most low personalization rates we have seen trace back directly to skipping this step and jumping straight to the canvas.

The Two Personalization Layers — Which One to Use When

There are two separate personalization mechanisms in SitecoreAI and it is important to be clear about what each one is for:

XM Cloud Built-inSitecore PersonalizeRule-based: geo, authentication state, device typeDMN decision models, optional external ML Analytical ModelsAvailable from day one — no additional product neededRequires Cloud SDK initialised correctly + CDP event data flowingWorks well for: simple launch-day conditionsWorks well for: complex behavioral targeting, multi-source decisioningNo discovery workshop required for basic setupDiscovery workshop recommended before building any decision model

The sequence that has worked well for us on multiple projects:

  1. Run the decision discovery workshop with the full team — define the outcome, inputs, and decision logic before opening Sitecore Personalize
  2. Launch with XM Cloud built-in rules for the simple conditions at go-live
  3. Validate the Cloud SDK is initialised correctly and events are actually landing in CDP
  4. Build Personalize decision models once you have confirmed the event data is clean, complete, and matching what your conditions expect

The Cloud SDK Initialisation Problem

This is the most common root cause we find when personalization is underperforming — and it is an invisible problem until you know to look for it.

If the Cloud SDK initialises after user interactions have already fired — which happens easily in React applications when component mount order is not carefully managed — the visitor’s earliest behavioral events never reach CDP. Those early events are often the highest-intent signals you have. Losing them means decision conditions based on page view counts, product category interests, or funnel stage simply never trigger.

The fix is straightforward. Initialise in the application root, before any component that fires events:

// ✅ Correct — in _app.tsx or the root layout
// Must run before any child component mounts
import { init } from '@sitecore/engage'
useEffect(() => {
init({
clientKey: process.env.NEXT_PUBLIC_CDP_CLIENT_KEY,
targetURL: process.env.NEXT_PUBLIC_CDP_TARGET_URL,
pointOfSale: process.env.NEXT_PUBLIC_CDP_POINT_OF_SALE,
cookieDomain: window.location.hostname,
cookieExpiryDays: 365,
})
}, []) // Empty dependency array - runs once on mount

✅ Tip: Add a test that confirms the SDK initialises before the first behavioral event fires. We added this to our integration test suite after finding the problem on a live project. It has caught the issue twice since then in earlier environments before it reached production.

How We Approach Experiment Design

Personalization without measurement is decoration. Before any personalized variant goes live, we agree on these things in writing — not after the experiment has already been running for two weeks:

  • A single clear hypothesis — for example, “showing industry-specific case studies to financial services visitors on the solutions page will increase demo request form submissions”
  • One primary conversion metric tied to a real business outcome, not a proxy metric like time on page or scroll depth
  • A minimum runtime before anyone looks at results — stopping an experiment after a few days because the early numbers look good gives you noise, not signal
  • A statistical significance threshold agreed before launch — 95% is the standard; 90% is acceptable for lower-stakes tests where speed matters more

One more thing: do not run multiple experiments on the same page at the same time. When two experiments are running simultaneously, you cannot isolate which one caused any change in conversion. We learned this the hard way on a project where three experiments were live at once and the results were completely uninterpretable.

Why This Helped Our Team — Personalization

Before we understood these patterns:

  • Variants served to 4–5% of sessions — default fallback almost everywhere
  • CDP guest profiles had incomplete behavioral event data because SDK was initialising too late
  • Decision models built without a discovery workshop were matching conditions almost nobody actually met
  • Experiments ran without agreed hypotheses — results were disputed and inconclusive

After:

  • Decision discovery workshop runs before any canvas work begins
  • SDK initialisation test is part of the standard integration test suite
  • Variant serving rates improved significantly once conditions matched real visitor profiles
  • Experiments have written hypotheses, success metrics, and minimum runtimes agreed before launch

Now — Governance for AI-Generated Content

In a governance review on a recent project, the client’s risk team asked this:

“If the AI generates content that is factually incorrect, or that violates our brand guidelines, or our regulatory requirements — who catches it, and what is the process for fixing it before it reaches the public site?”

The system was working well technically. But there was no governance model to point to. That is a different problem and it needs to be solved before AI-generated content goes near production — not after a stakeholder raises it in a review.

1. Human Review Is Structural — Not a Nice to Have

Sitecore’s own platform design is explicit about this: AI agents generate and automate, but human review sits before any content reaches production. In every Agentic Studio Flow we build, every path that leads to a publish action has a Spaces review step between it and the publish trigger.

This is not about distrust of the AI output. It is about having a clear, auditable answer to the question: “who approved this content before it went live?” That answer needs to be a named person with a timestamp — not “the agent did it.”

❌ Without Human Review Gate

  • AI generates → publishes directly
  • No audit trail for what shipped
  • No one to catch off-brand or incorrect output
  • Governance review fails on first question

✅ With Spaces Review Step

  • AI generates → goes to review board
  • Author approves, edits, or rejects
  • Approval record with name + timestamp
  • Governance review has a real answer

2. Brand Guardrails Need Testing — Not Just Configuration

Sitecore Stream grounds AI generation in your brand guidelines document. This reduces off-brand output. But “reduces” is not the same as “prevents” — and in a regulated industry, that distinction matters.

What we do in practice:

  • Define “on-brand” in explicit, testable terms — specific phrases to avoid, required tone characteristics, prohibited content categories — not just “upload the PDF”
  • Build a validation test set of 20–30 prompts with known expected outputs, and known boundary cases that should produce a compliant refusal or flagged output
  • Re-run this validation set after any brand guidelines update, and after any platform update that touches the Stream layer
  • Log every AI generation with prompt, model version, and timestamp — this is the audit trail for compliance questions

⚠️ Common mistake: Teams upload the brand guidelines PDF once at setup and assume the guardrails are working. Brand guidelines change. Platform updates happen. Without a validation test set that runs regularly, you do not actually know what the guardrails are doing.

3. AI Configuration Should Be Environment-Specific

Dev, staging, and production should not use the same AI model, the same brand guidelines document version, or the same moderation settings. We treat all AI configuration the same way we treat database connection strings — stored as environment-specific variables, version-controlled, never hardcoded.

Config ItemDevStagingProductionAI modelLighter capacity — lower cost for iterationProduction parityFull capacityBrand guidelines docWorking draftClient-approved draftFinal approved versionModeration thresholdLenient — faster feedback loopMediumStrictHuman review gateOptionalRequiredRequired

4. CI/CD Pipeline — What Changes With SitecoreAI

The existing XM Cloud deployment pipeline carries over — Deploy App, Sitecore CLI, GitHub Actions all work the same way. What is new is that the pipeline may now need to handle agent and flow deployments from Agentic Studio and app deployments from App Studio. The DevOps tooling for Studio is still maturing through 2026, so expect some manual steps while that catches up.

Here is the pipeline sequence we use on SitecoreAI projects:

1. Unit tests — JSS components (Jest / React Testing Library)
2. Sitecore CLI sync — content serialization validation
3. Integration tests — webhooks, Management API (all workflow states)
4. Brand guardrail validation suite ← automate this, do not skip it
5. Deploy to staging via Deploy App API
6. Smoke tests — page render, personalization variants, search results
7. Manual approval gate ← required before any production deployment
8. Deploy to production via Deploy App API

✅ Step 4 is the one most teams skip in early sprints and then regret later. Automating the brand guardrail validation as part of CI means you find problems before they reach staging, not after a client review.

5. Questions to Have Answers for in Regulated Industries

If you are building for financial services, healthcare, or public sector clients, prepare clear answers to these before any pre-sales conversation or delivery kick-off:

  • Data residency: SitecoreAI runs on Microsoft Azure. Sitecore Stream uses Azure OpenAI. Confirm which Azure regions are used for processing. Clients with strict data residency requirements will ask this in the first security review.
  • Retention: Define a log retention policy for AI generation records before go-live. These are audit records, and regulated industries often have minimum retention requirements that vary by sector.
  • Model transparency: Log the exact model version alongside every AI generation event. If a compliance issue surfaces six months after launch, you need to be able to show which model version produced that content on that date.
  • Bias and fairness: Healthcare and public sector clients will ask whether AI-driven personalization treats different audience segments equitably. Plan periodic audits of personalization variant distribution across demographic segments into your operational monitoring — not just as a one-time launch check.

Why This Helped Our Team — Governance

Before we had a governance model in place:

  • No audit trail for AI-generated content that had shipped to production
  • Brand guardrails assumed to be working — no regular validation running
  • AI configuration differences between environments were undocumented and inconsistent
  • Data residency and retention questions in client reviews had no ready answers

After:

  • Every piece of AI-generated content that reached production has an approval record — named reviewer, timestamp, and any edits made
  • Brand guardrail validation runs as part of CI — problems are caught before staging, not in client reviews
  • AI configuration is version-controlled alongside the rest of the codebase, with clear environment-specific settings
  • Data residency, retention, and model transparency answers are prepared as standard artefacts in the project discovery phase

Final Thoughts

Personalization and governance are two areas where teams consistently invest less time upfront than they should — and then spend significantly more time fixing things after go-live than they would have spent getting the foundations right at the start.

For personalization: run the decision discovery workshop. Validate the Cloud SDK before any experiment goes live. Match conditions to real visitor profiles, not idealised ones.

For governance: set up the human review gate before the first AI agent touches production. Treat brand guardrails like tests — they need to run regularly, not just once at setup. And have the regulated industry questions answered before a client asks them in a review meeting, not during one.

That wraps up the Sitecore AI series. I hope these three posts have been useful — whether you are planning a new SitecoreAI project, mid-way through an XM Cloud migration, or trying to figure out why your personalization is not firing the way you expected.

Stay tuned for more Sitecore-related articles, tips, and tricks to enhance your Sitecore experience.

Till then, happy Sitecoring! 😊

Please leave your comments or share this article if it’s useful for you!

Monday, April 20, 2026

SitecoreAI and Sitecore Studio — What Actually Changed and What We Can Build Now

 Hello Sitecorian Community,

If you’ve been working on Sitecore projects over the last few years, you’ve probably seen this situation at some point:

“We have XM Cloud for content, CDP for customer data, Personalize for targeting, and Content Hub for assets — but our team spends half the day switching between four different portals.”

And honestly, that was the reality for most enterprise Sitecore projects. Different logins. Different APIs. Different billing conversations. Developers writing integration glue between products that were supposed to talk to each other.

At Sitecore Symposium 2025 in Orlando, Sitecore announced SitecoreAI — and on November 10, 2025, every XM Cloud tenant was automatically upgraded. No migration. No new contract required.

Let me walk through what actually changed, and what it means for teams building on Sitecore right now.

What Is SitecoreAI, Really?

The simplest way to say it:

SitecoreAI is XM Cloud + CDP + Personalize + Search + Content Hub — all unified into one platform, one login, one data model, with AI built into every layer.

Sitecore calls this shift going from “composable” to “composed.” The flexibility is still there underneath. But the friction between products is significantly reduced on top.

Before vs. After

❌ Before (XM Cloud era)

  • 4 separate portals, 4 logins
  • Token-based AI billing surprises
  • Separate contracts for each product
  • Sitecore Stream was a separate add-on
  • “You can’t customise SaaS”

✅ After (SitecoreAI)

  • One unified workspace, one login
  • No token billing — one metric per module*
  • Buy one module, access the full suite
  • Brand-aware AI copilot baked in
  • Sitecore Studio — governed extensibility

* Sitecore COO Dave Tilbury on stage at Symposium: “no addons, no upsells, no tokens, no games.” Pricing shifts to one metric per module — e.g. requests for CMS, profiles for CDP. Source: Sitecore Developer Portal FAQ.

What Stays the Same for Developers

This is probably the most important thing for teams who are mid-project:

  • Your JSS setup is unchanged
  • Your Sitecore CLI and serialization workflows carry over
  • The Deploy App pipeline works exactly the same
  • All existing SDK integrations continue without breaking changes

The platform adds new capabilities on top. It doesn’t remove what was already working.

⚠️ One thing to watch: Content Hub integration into SitecoreAI is being phased through 2026. If your project depends heavily on Content Hub DAM workflows, check the Sitecore changelog regularly and build with loose coupling where Content Hub is involved.

Sitecore Studio — The Part That Changes Daily Workflows

If SitecoreAI is the platform, Sitecore Studio is where we actually build and extend things. It has four parts:

  • Agentic Studio — build and run AI agents and multi-step flows
  • App Studio — build and package custom extensions and apps
  • Sitecore Connect — pre-built connectors (Salesforce, OpenAI, Gemini, etc.)
  • Marketplace — discover and publish community-built agents and apps

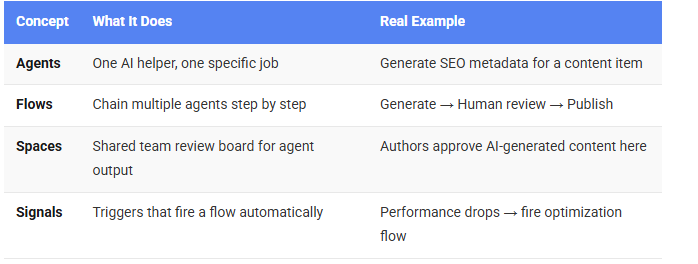
Agentic Studio — Four Concepts You Need to Know First

Everything in Agentic Studio is built around four things. Understanding these before you start building will save a lot of confusion:

A Real Use Case: Bulk SEO Metadata Generation

Here is a situation we came across recently. A client had 600 product pages that needed SEO titles, descriptions, and keywords updated before a Monday go-live. Previously, this would mean a custom PowerShell pipeline and a lot of manual effort.

With Agentic Studio, here is how the flow looks:

Step 1 — Create the Agent

In Agentic Studio, create a new agent with one clear purpose: “Generate SEO metadata for a given page item.” Keep the scope narrow. One agent = one job. This gives you consistent, predictable output.

Step 2 — Add Brand Context

Upload the client’s brand guidelines document as RAG context for the agent. Sitecore Stream uses this to ground the AI generation. The output then sounds like the client’s actual brand voice — not generic AI copy.

Step 3 — Add a Human Review Step

Connect the agent to a Spaces review step before any publish action. This is not optional in enterprise setups. When a stakeholder asks “who approved that AI-written content?” — you need to point to an actual approval record.

Bulk content trigger (query content tree)
↓
[Agent: Generate SEO Metadata]
↓
[Spaces: Author Review Board]
↓ (on approval)
[Publish to Experience Edge]

Step 4 — Run It Overnight

Attach a bulk trigger to the flow with a content tree query. 600 pages queue through the agent overnight. Monday morning, the review board has everything waiting. Authors approve or edit, then publish. The weekend is saved.

App Studio — For Developers Specifically

While Agentic Studio is for building flows, App Studio is where developers build the underlying extensions — custom connectors, UI plugins, packaged apps that extend the platform.

Think of it as the modern replacement for custom pipelines and processor chains, but built as versioned, deployable, shareable apps. If you have a Helix background, the pattern feels familiar — bounded modules, clear interfaces, single responsibility. The deployment model is SaaS-native instead of server-side, but the discipline translates directly.

Before You Demo — Set Up Permissions First

One thing we learned early: configure role-based permissions in Sitecore Studio before showing it to a client. Studio uses the same permission model as the rest of SitecoreAI. You can control who creates agents, who deploys flows, who can modify a live workflow.

The question “can someone accidentally publish AI content to production?” will always come up. Having the answer ready — and demonstrating the controls — builds a lot of confidence.

Why This Matters for Our Teams

Before SitecoreAI:

  • Bulk content operations needed custom PowerShell scripts
  • AI generation required external tooling and custom pipelines
  • No governed way to build reusable AI workflows inside the platform

After SitecoreAI:

  • Agents handle bulk operations with a structured flow
  • Brand-aware generation is built into the authoring environment
  • App Studio gives developers a governed way to build and ship extensions

Final Thoughts

SitecoreAI is not just a name change. It is a genuine platform shift that changes how teams work day to day — from how content is created, to how integrations are built, to how AI automation fits into existing workflows.

The good news for teams mid-project: your existing toolchain is unchanged. You can start exploring Studio incrementally without disrupting what is already in flight.

If you are starting a new project, I would recommend spending a sprint early just exploring Agentic Studio. Build one simple agent, run it through a flow with a review step, and see where it fits in your client’s content operations. That early spike will shape how you scope the rest of the project.

Stay tuned for more Sitecore-related articles, tips, and tricks to enhance your Sitecore experience.

Till then, happy Sitecoring! 😊

Please leave your comments or share this article if it’s useful for you!