Tuesday, April 11, 2017

Sitecore EditFrame in MVC

Hi All,
Today we discuss about Editframe in sitecore MVC.
This is use for edit the associated fields value by providing content editor look to experience editor user. Like there are many fields which are not easily edit in experience mode for that we can use editframe.
Steps are below:
1. Navigate to code db "/sitecore/content/Applications/WebEdit/Edit Frame Buttons"
2. Under this node create a seprate directory for you project like "DemoProject"
3. Right click and insert "Field Editor Button" as below:


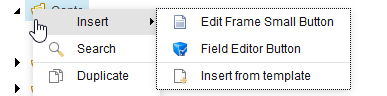
This button create from "/sitecore/templates/System/WebEdit/Field Editor Button" template.
Give a suitable name to button like "CustomTextEdit".
4.Fill the Name in "Header", choose icon in "Icon" and in "Tooltip" type description which you want that come in hover.
5. In "Fields - pipe-separated list of field names to be edited by the Field Editor [shared]:" Place the name of fields which you want to edit like:
ex: Title
ex: Title|Description   etc.
6.Now in code use editframe as below:

@using (Html.BeginEditFrame(Html.Sitecore().CurrentRendering.DataSource, "//sitecore/content/Applications/WebEdit/Edit Frame Buttons/DemoProject"))
{

}


Alternative:
If you don't wanna use above method then there is alternative as well:
1. Navigate to in core db "/sitecore/content/Applications/WebEdit/Custom Experience Buttons"
2. Insert a field editor item based on "/sitecore/templates/System/WebEdit/Field Editor Button" button
3. Same as above in "Fields" fill the field name as below:
ex: Title

ex: Title|Description   etc.
4. now come in master db and found the rendering for which you wanna this editframe.
5. On specific rendering under "Experience Editor Buttons" select your custom button.

Reference:
http://www.awareweb.com/awareblog/11-25-14-custombuttonspageeditor
https://visionsincode.wordpress.com/2015/01/08/how-to-use-editframe-in-sitecore-mvc/

I hope you enjoy this Sitecore blog. Stay tuned for more Sitecore related articles.

Till that happy Sitecoring :)

Please leave your comments or share this article if it’s useful for you.

Thursday, April 6, 2017

Change SQL Server Password if forget

Hi,

Some time we come in a situation where we forgot our ssms or squeal server password.
Here is way to unlock sa user account or change the password:
  1. Login into SQL Server using Windows Authentication.
  2. In Object Explorer, open Security folder, open Logins folder under Security->Logins . Right click on sa account and go to Properties.
  3. Type new password and confim password.
  4. That's done!

Note: If you face issue that password is not changed and having some error then please have a look under Status option and check 'sql server authentication' is unchecked 


I hope you enjoy this Sitecore blog. Stay tuned for more Sitecore related articles.

Till that happy Sitecoring :)

Please leave your comments or share this article if it’s useful for you.

Wednesday, April 5, 2017

Coveo setup for Sitecore 8


Hi,

Today we discuss how setup coveo for Sitecore 8.

Step 1: Download Coveo for Sitecore, Coveo Enterprise Search and Coveo Search API

Note: Download coveo based on your sitecore version.
Step 2: Create an admin user for Coveo on your computer
  • Open Control Panel -> System and Security -> Administrative Tools
  • Open Computer Management
  • Go to Local users and groups -> Users
  • Right click -> New User
  • Name: Coveo
  • Full Name: Coveo Search
  • Password: search (use something more secure in a production environment)
  • Uncheck user much change password at next login & account disabled
  • Check user cannot change & password never expires
  • Make the user a member of Administrators and Users
Step 3: Install Coveo Enterprise Search
  • You cannot run the installer from a network drive
  • Let it install any necessary files
  • Agree to terms
  • Choose typical Installation
  • Configure Account for Access
    • Use the user account created in step 2
  • Do not change config for other options
    • Secure access not necessary for a local instance
    • Take note if you change the RabbitMQ username: password, you will need these during the Sitecore package install
  • Allow Firewall Access if prompted
Note:
1. It also asks for the install coveo diagnostic tool. Install that and open below URL:
Here 8081 is default port you also can change that.
2. Please also create a folder C:\CES7 , this is default folder you also can change that but keep in mind if you change here then you also select that folder in during Sitecore coveo package installation.
Step 4: Install Coveo Search API
Note: Select the check box “This installation is part of a Sitecore installation” and after click next select “Generate Random Token”
If you found any difficulties in above step then Please have a look on below URL:
Step 5: Make sure Coveo services are running
  • View Local Services by search “View Local Services”
  • Start all Coveo services
Step 6: Restart IIS
  • This may not be necessary. But it makes sure the localhost:8080 and localhost/AdminService are working correctly.
Step 7: Verify Admin Service

Step 8: Verify RabbitMQ
Step 9: Verify Coveo Search API
  • Go to http://localhost:8080
    • You should get a message the search page is not configured yet
Step 10: Verify Coveo Admin Tool
  • Go to http://localhost:8081
    • You should see the coveo admin tool
Step 11: Install Coveo for Sitecore (sitecore package)
  • Open Sitecore Desktop -> Developer Tools -> Installation Wizard
  • Upload Sitecore package and Install
  • Follow wizard prompts
    • Coveo is on the same server as the sitecore instance
    • Coveo Index Path: c:\CES7 (create this folder if it does not exist)
    • Search API Url: http://localhost:8080/
    • Application Secret: (the secret key created in step 4)
    • Configure RabbitMQ: (leave defaults or enter credentials used in step 3)
    • Admin Service URI: http://localhost/AdminService
    • Username and Password: (for the sitecore admin account)
    • Sitecore license: Copy and paste your license file contents
    • Rename Coveo files /websiteroot/Website/App_Config/Includes/
      • Coveo.SearchProvider.config.example to Coveo.SearchProvider.config.
      • Coveo.SearchProvider.Rest.config.example to Coveo.SearchProvider.Rest.config.
      • Coveo.UI.Controls.config.example to Coveo.UI.Controls.config
    • Restart Sitecore client and server.
    • I personally didn’t disable lucene config.
Step 12: Check Coveo Diagnostics
  • Open Sitecore Control Panel -> Coveo Diagnostic Page
  • All components should have a green light and message “up and running”
    • Coveo Search REST Endpoint can have a red X and an error and the site will still function correctly
Note: If Coveo Search Web Service is not running or give Failed to obtain resource located at 'http://sc8initial/coveo/rest?indexName=Coveo_web_index'. [BEGIN RESPONSE BODY]{"statusCode":408 error.
It means you don't have any serverCertificatePath or clientCertificatePath in your config.yml. Those settings are mandatory.

serverCertificatePath should be the path to the CES7 index's cert-ca.pem certificate file.

clientCertificatePath should be the path to the CES7 index's cert-iis.p12 certificate file.
serverCertificatePath: C:\CES7\Config\Certificates\cert-ca.pem (default)
clientCertificatePath: C:\CES7\Config\Certificates\cert-iis.p12 (default)

Or have a look same issue on below URL:

After giving the path go to “view local services” and restart the “Coveo search api”.
Now you can access :
http://{HostName}/coveo/rest

After this when you open diagnose page you found that all services are up and running smooth.

Ex: http://{HostName}/sitecore%20modules/Web/Coveo/Admin/CoveoDiagnosticPage.aspx


///////////////////////////////////////////////////////////////////////////////////////
Some Useful Coveo local system URL:
http://localhost:8081/Configuration/InitialSetup/InitialSetup.aspx  (Coveo Admin Tool): For index configuration handled by sitecore
or
http://localhost:8081 (Coveo Admin Tool): For index configuration handled by sitecore
http://localhost/adminservice  (Admin Service)
http://localhost:8080 (Coveo Search API)
http://{HostName}/coveo/rest
http://{HostName}/sitecore%20modules/Web/Coveo/Admin/CoveoDiagnosticPage.aspx


//////////////////////////////////////////////////////////////////////////////////////


I hope you enjoy this Sitecore blog. Stay tuned for more Sitecore related articles.

Till that happy Sitecoring :)

Please leave your comments or share this article if it’s useful for you.

Tuesday, April 4, 2017

Setup custom smtp for Sitecore EXM 3.0 and 3.4

For setup custom SMTP for EXM 3.0:  You just need to add one patch config for SMTP setting which I previously described on my blog. You can found here.

Just move this patch file under include folder of Sitecore.

When you try for sending test email via EXM it show message "
The connection to the Sitecore App Center could not be established.". 
For removing this because you are usingIf you are using custom mail server instead of Sitecore App Center then you need to set the “UseLocalMTA” as “true” in Sitecore.EmailCampaign.config with SMTP details.
Now you are able to send an email via EXM 3.0.

For setup custom SMTP for EXM 3.4: For setup EXM 3.4 with Sitecore 8.2 you just need to update following config


At first, I follow the instruction which is shown when we install EXM that are shown below:


***Important! Copy and save this information***
==========================================================
    BEFORE YOU CLICK NEXT:
    - Add two empty connection strings with the names "exm.master" and "exm.web" to /App_Config/ConnectionStrings.config e.g. <add name="exm.master" connectionString="" /> and <add name="exm.web" connectionString="" />.
    - Add two connection strings with the names "EXM.CryptographicKey" and "EXM.AuthenticationKey" to \App_Config\ConnectionStrings.config. The keys should be represented in hexadecimal format by 64 characters. For more information please see the installation guide.

    BEFORE YOU CLOSE THE WIZARD:
    - Click the checkbox ‘Restart the Sitecore client’.

    AFTER YOU CLOSE THE WIZARD:
    After the package is installed, follow these steps to complete the EXM installation:
    1. Attach the Sitecore.Exm and Sitecore.Exm_Web databases. The files can be located in the Data folder.
    2. Update the connection strings "exm.master" and "exm.web" in /App_Config/ConnectionStrings.config, e.g. <add name="exm.master" connectionString="user id=user;password=password;Data Source=(server);Database=Sitecore_EXM" /> and <add name="exm.web" connectionString="user id=user;password=password;Data Source=(server);Database=Sitecore_EXM.Web" />.
    3. Enable the Sitecore MTA or the Custom SMTP provider files in the /App_Config/Include/EmailExperience folder by removing the .disabled extension from the files.
    4. In the /App_Config/Include/Sitecore.Analytics.Tracking.config file, ensure the value of the Analytics.ClusterName setting is set to your instance host name.
    5. Publish your site using smart publish. 
    6. In the App Center, configure the Email Delivery service if you are using the Sitecore MTA provider.
    7. In the App Center, sign up for the Email Preview and Spam Detect services. [optional]

I just do some update in few config files that are listed below.
1. Sitecore.EDS.Provider.CustomSmtp.config


In this config I do following changes:


<smtpSettings type="Sitecore.EDS.Core.Net.Smtp.SmtpSettings, Sitecore.EDS.Core" singleInstance="true">
                    <server>smtp.gmail.com</server>
                    <port>587</port>
                    <userName>xxxxxxxx@gmail.com</userName>
                    <password>xxxxxxx</password>
                    <authenticationMethod>Login</authenticationMethod>
                    <startTls>true</startTls>
                    <proxySettings ref="exm/eds/proxySettings" />
</smtpSettings>

      2.  Sitecore.EDS.Provider.CustomSmtp.Sync.config


<pop3Settings>
          <pop3Setting type="Sitecore.EDS.Core.Net.Pop3.Pop3Settings, Sitecore.EDS.Core" singleInstance="true">
            <server>pop.gmail.com</server>
            <port>995</port>
            <userName>xxxxxxxxx@gmail.com</userName>
            <password>xxxxxxxxx</password>
            <useSsl>true</useSsl>
            <startTls>true</startTls>
            <proxySettings ref="exm/eds/proxySettings"/>
          </pop3Setting>
 </pop3Settings>

        3. Sitecore.Analytics.Tracking.config


<s<setting name="Analytics.ClusterName" value="{Hostname}" />

I I also path a custom config as well that include following entry.


<?xml version="1.0" encoding="utf-8" ?>
<configuration xmlns:patch="http://www.sitecore.net/xmlconfig/">
  <sitecore>
    <settings>
      <setting name="MailServer" value="smtp.gmail.com"/>
      <!--  MAIL SERVER USER
        If the SMTP server requires login, enter the user name in this setting
  -->
      <setting name="MailServerUserName" value="xxxxx@gmail.com"/>
      <!--  MAIL SERVER PASSWORD
        If the SMTP server requires login, enter the password in this setting
  -->
      <setting name="MailServerPassword" value="xxxxxx"/>
      <!--  MAIL SERVER PORT
        If the SMTP server requires a custom port number, enter the value in this setting.
        The default value is: 25
  -->
      <setting name="MailServerPort" value="587"/>
   
    </settings>
  </sitecore>
</configuration>

After these changes I am able to send email via EXM 3.4 for Sitecore 8.2.

Note: Instead of setting up the custom email account for testing I strongly recommend to use papercut for this. this is use for setup custom SMTP setup for the local system. You can found here.

I also found one blog by Brijesh Patel more useful as well. You can found that blog here.

I hope you enjoy this Sitecore blog. Stay tuned for more Sitecore related articles.

Till that happy Sitecoring :)

Please leave your comments or share this article if it’s useful for you.