Showing posts with label sitecore 10. Show all posts

Tuesday, September 22, 2026

Building a Custom Sitecore MCP Server in .NET — Tailored for Real Project Work

Hello Sitecorian Community! 👋

This is the blog I have been building toward across the whole series. Blogs 1–3 covered the foundations — understanding MCP, building a minimal .NET server, and setting up Anton Tishchenko’s community server against a live XP instance. All of that was preparation for this: building something genuinely mine, shaped around the actual work I do every day on a Sitecore project.

The Problem I Wanted to Solve

When I started thinking about what to build, the answer came quickly — because the pain was already obvious.

On every Sitecore project I have worked on, there is a category of work that is critical but relentlessly repetitive: managing Content Security Domain (CSD) role access. CSD is Sitecore’s standard security model for controlling which roles can read, write, rename, create, delete, or administer content nodes in the content tree.

On the surface it sounds simple — give a role access to a path. In practice, on an active project with multiple content authors, developers, and client stakeholders all requesting access at different points, it turns into a constant stream of small but time-consuming tasks.

The Before: A Manual, Repetitive Grind

Here is what the daily reality looked like before this server existed.

Every request followed the same path through the Sitecore Security Editor:

  1. Open the Security Editor in the Sitecore Content Editor
  2. Search for the role by name — sounds trivial, but role names across multiple domains (sitecore\, cog\, client-specific) are easy to get wrong, especially for roles you don't work with daily
  3. Navigate to each content node — sometimes a single path, often multiple paths (content root + media library root for the same site)
  4. Tick the correct permission type — CSD access (Read + Write) or CSD Admin (6 rights), with inheritance enabled so child items pick it up
  5. Repeat for every path in the request — a single request often covers 2–4 paths
  6. Repeat the whole thing for every role — some requests cover multiple roles at once
  7. Verify the rules were applied correctly and propagated as expected

The hidden cost: this work required a developer. It was not something a BA or project manager could safely do through the Sitecore UI. Every request became a ticket, a context switch, an interruption to actual development work — adding zero feature value, carrying real risk of human error.

Figure 1 — The same CSD access request: a 5-step manual process taking 15–20 minutes vs a single natural language prompt taking under 1 minute
Figure 2 — Developer hours spent on CSD access management. The onboarding scenario (30–40 requests) sees the greatest saving: 5+ hours to ~45 minutes

The After: Natural Language + MCP

With the Sitecore MCP Server connected to VSCode, the same work now looks like this:

I need to set up CSD access for the "cgdev" team on the DemoSite.

1. Search for Sitecore roles matching "cgdev" to find the exact role names.
2. Grant CSD access (Read and Write) for the found roles on:
- /sitecore/content/DemoSite
- /sitecore/media library/DemoSite
3. Also grant CSD Admin access to any role matching "cgadmin" on the same paths.

GitHub Copilot in agent mode chains the tool calls in sequence — search, then grant, then confirm — and summarises the result. The whole thing takes under a minute. No Security Editor. No navigation. No repeated clicking across paths and roles.

The CSD Tools — Five Tools That Changed My Daily Workflow

The server exposes five tools specifically for CSD role access management. Here is each one in detail.

Figure 3 — Grant flow (top) and revoke flow (bottom). Both start with SearchCsdRole to confirm the exact identity. The no-Deny constraint in the revoke tools is enforced in code — not a prompt instruction

SearchCsdRole — Find the exact role identity first

Before granting or revoking access, you need the exact role identity string — including the domain prefix. On a real project with multiple domains (sitecore\, cog\, client-specific), guessing is error-prone.

This tool searches across all Sitecore domains by partial name match and returns the exact identities.

Search for Sitecore roles matching the name "cgdev".

Returns results like sitecore\cgdev, cog\cgdeveloper — whichever match. You pass those exact strings to the grant or revoke tools. This one step alone eliminates a common class of access mistakes.

GrantCsdAccess — Read + Write with inheritance

Grants CSD access (Read and Write) to one or more roles across one or more content paths. All rules apply with PropagationType Any, meaning they inherit to all child items automatically.

Grant CSD access for the role "sitecore\cgdev" on the following paths:
- /sitecore/content/DemoSite
- /sitecore/media library/DemoSite

You can also pass multiple roles at once. What used to be 4 separate Security Editor operations — 2 roles × 2 paths — is now one prompt.

Safety behaviour: paths that do not exist in Sitecore are reported as PathNotFound and skipped. The tool never silently fails and never applies partial access without telling you.

GrantCsdAdminAccess — Full admin rights with inheritance

Grants full CSD Admin access — Read, Write, Rename, Create, Delete, and Administer — with inheritance. Used for roles that need full editorial control over a site section, not just content authoring. Previously this required manually ticking six checkboxes per role per path in the Security Editor — easy to miss one under time pressure.

Grant CSD Admin access to the role "sitecore\cgadmin" on /sitecore/content/DemoSite 
and /sitecore/media library/DemoSite.

RevokeCsdAccess — Remove Read + Write safely

Removes CSD Read and Write Allow rules from roles on specified content paths. Designed for offboarding team members or restructuring access when a content section is reorganised.

Revoke CSD access for "sitecore\cgdev" on /sitecore/content/DemoSite 
and /sitecore/media library/DemoSite.

The most important design decision in this tool: it reads the item’s explicit ACL, filters out only the target Allow entries for the specified role, and resets the ACL with those entries removed. No Deny rules are ever written. A mistake during a revoke operation should never lock someone out of Sitecore content unexpectedly. This constraint is enforced in code — it cannot be overridden by a prompt.

If a role had no rules on an item, the tool reports RulesRevoked: 0 for that path and continues. It never fails silently.

RevokeCsdAdminAccess — Remove all 6 admin rights safely

Same safe revoke behaviour, but targets all six CSD Admin rights. Used when a role is being downgraded from admin to standard CSD access, or fully removed from a section.

Revoke all CSD Admin permissions for "sitecore\cgadmin" on /sitecore/content/DemoSite.

CSD Access Rights Reference

Figure 4 — CSD grants Read + Write. CSD Admin grants all 6 rights. Both propagate to all descendants automatically

How the CSD Tools Work Under the Hood

The CSD tools build inline SPE (Sitecore PowerShell Extensions) scripts at call time and execute them through the same PowerShell remoting client used by the RunSitecorePowerShellScript tool.

  • Role searches use Get-Role -Filter with the partial name you provide
  • Access grants use New-ItemAcl and Add-ItemAcl with PropagationType Any
  • Access revokes read the item’s full explicit ACL, filter out the target Allow entries for the specified role, and apply the cleaned ACL back with Set-ItemAcl — no Deny rules are ever constructed or written

The Time Saving — In Real Numbers

Across a normal working week, that is roughly 8–10 hours of developer time moving from access management back to actual development work.

The Other Tools in the Server

Figure 5 — All 8 tools across 4 areas. CSD tools are the most project-specific; GraphQL, Item Service, and PowerShell cover broader daily Sitecore interactions

QuerySitecoreGraphQl

Run any GraphQL query against a Sitecore schema (edge, master, core). Handles the HTTP POST with the sc_apikey header. Supports variables and schema introspection.

Query the Sitecore Home item via GraphQL using the path /sitecore/content/Home in English.

Run a Sitecore GraphQL introspection query to list all available types on the edge schema.

GetSitecoreItemByPath

Retrieve a Sitecore item and all its fields by content tree path using the Item Service API (SSC). Supports any database and language.

Get the Sitecore item /sitecore/content/Home from the web database and tell me 
if it has been published — check the __Updated field.

RunSitecorePowerShellScript

Execute any script via SPE remoting — the most open-ended tool in the set. Copilot constructs the script from your intent, or you write it yourself.

Run a Sitecore PowerShell script to get all direct children of /sitecore/content/Home 
and return their Name, ID, and TemplateName as JSON.

Run a Sitecore PowerShell script to clear all Sitecore caches on the CM server.

Program.cs — How It All Wires Up

using Microsoft.Extensions.DependencyInjection;
using Microsoft.Extensions.Hosting;
using Microsoft.Extensions.Logging;

var builder = Host.CreateApplicationBuilder(args);
// All logs to stderr - stdout is reserved for MCP protocol messages
builder.Logging.AddConsole(o => o.LogToStandardErrorThreshold = LogLevel.Trace);
builder.Services
.AddMcpServer()
.WithStdioServerTransport()
.WithTools<GraphQlTools>()
.WithTools<ItemServiceTools>()
.WithTools<PowerShellTools>()
.WithTools<CsdAccessTools>();
await builder.Build().RunAsync();

Each tool class registered independently with .WithTools<T>(). Adding a new tool category is one line.

Prerequisites

  • .NET 8 SDK
  • Sitecore XP or XM CM instance with GraphQL endpoint enabled, Item Service (SSC) enabled, and SPE installed with remoting enabled

Getting Started

git clone https://github.com/gaurarun777/sitecore-mcp.git
cd sitecore-mcp

Open in VSCode — the .vscode/mcp.json prompts for all credentials interactively when the server starts. Nothing sensitive is hardcoded.

⭐ github.com/gaurarun777/sitecore-mcp

Key Lessons from Building This

Design safety into the tool, not into the prompt

The no-Deny-rules constraint in the CSD revoke tools is enforced in code. It cannot be overridden by any prompt. On tools that touch access control, safety behaviour belongs in the implementation — not in hoping the caller remembers the right instruction.

Search before act

The SearchCsdRole tool exists for a reason. Role names across multiple Sitecore domains are easy to misremember. Searching first and confirming the exact identity before granting or revoking is the difference between a clean operation and an access mistake that takes time to diagnose and fix.

Repetitive work is the right first target

The CSD tools did not replace complex, high-judgment Sitecore development work. They replaced work that was clearly repetitive, time-consuming, and low-judgment — the kind where the value is accuracy and speed, not deep thinking. That is always the right first target for any automation.

One prompt can chain multiple tool calls

Copilot in agent mode chains tool calls automatically. You do not need to build orchestration into the server. Design tools to be focused and single-purpose — let the AI chain them together in response to a compound prompt.

The Full Journey

When I sat in that SUGCON India 2026 session, I wasn’t thinking about access management scripts. But when I looked at where developer time was actually going on the project, the answer was obvious. The MCP server did not solve an interesting engineering problem — it solved a real, daily, expensive one.

That is probably the most useful thing you can build.

Till then, Happy Sitecoring! 😊

References:
github.com/gaurarun777/sitecore-mcp
Microsoft Learn — Build MCP Server with C#
Flux Digital — Sitecore MCP Server with XP + VSCode & CoPilot
Anton Tishchenko — mcp-sitecore-server (GitHub)
SUGCON India 2026 — sitecoreknowledgeshare.blogspot.com
Monday, August 3, 2026

Connecting Sitecore XP to Your IDE via MCP — With VSCode and GitHub Copilot

Hello Sitecorian Community! 👋

Blog 2 gave me the working mental model for MCP. Now it was time to point that knowledge at something real: a live Sitecore XP instance, from inside VSCode, through GitHub Copilot.

While exploring what the community had already built, I came across an excellent guide from the Flux Digital team:

📄 Setting Up Sitecore MCP Server with XP + VSCode & CoPilot — Flux Digital

This is based on Anton Tishchenko’s open-source Sitecore MCP server:
📦 github.com/Antonytm/mcp-sitecore-server (released May 2025)

I’m going to walk through the full setup here with additional context from my own experience along the way.

What this server gives you access to

Once connected, your IDE can interact with a running Sitecore XP instance for:

  • Content item operations — read, create, and update items
  • User, domain, and role management
  • Search index control — rebuild, status checks
  • Databases, caches, and log access

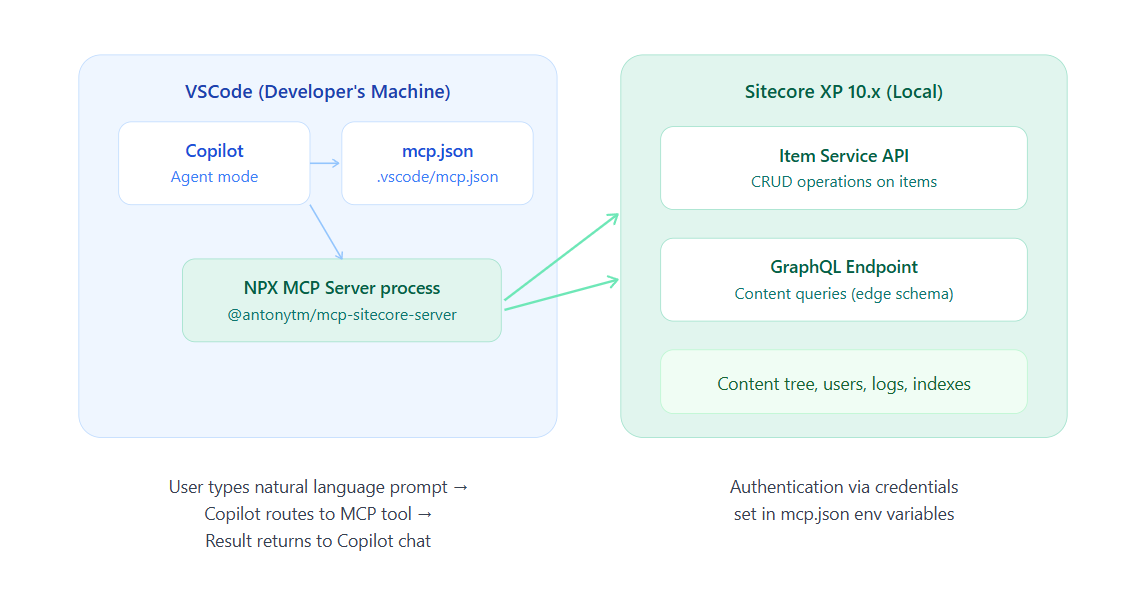
The full architecture of this setup


Full architecture of the Sitecore MCP setup. VSCode reads the mcp.json config to launch the server process via NPX, which then authenticates and queries the local Sitecore XP instance

Prerequisites

  • Sitecore XP 10.x installed locally (the Flux Digital guide uses 10.4)
  • Node.js and NPX installed on your machine
  • GraphQL configured on your Sitecore instance with the Item API enabled
  • VSCode with the GitHub Copilot extension

Step-by-step setup

  1. Create your MCP configuration fileIn a .vscode folder at the root of your Sitecore project, create a new file named mcp.json:
{
"servers": {
"Sitecore Local": {
"type": "stdio",
"command": "npx",
"args": ["@antonytm/mcp-sitecore-server@latest"],
"env": {
"TRANSPORT": "stdio",
"GRAPHQL_ENDPOINT": "https://<your-sc-hostname>/sitecore/api/edge/graphql",
"GRAPHQL_SCHEMAS": "edge,master,core",
"GRAPHQL_API_KEY": "{YOUR-API-KEY-GUID-HERE}",
"ITEM_SERVICE_SERVER_URL": "https://<your-sc-hostname>",
"ITEM_SERVICE_DOMAIN": "sitecore",
"ITEM_SERVICE_USERNAME": "admin",
"ITEM_SERVICE_PASSWORD": "yourpassword"
}
}
}
}


Update every value to match your local Sitecore instance — hostname, API key, and credentials.

2. Start the MCP server

Open the mcp.json file in VSCode. A 

Start

button appears inline at the top of the file — click it. VSCode launches the server as a background process via NPX, downloading the package on the first run. Monitor the output in the VSCode 

Output 

panel to confirm it started cleanly.

3. Switch Copilot to Agent mode and verify the connection

Open GitHub Copilot in VSCode and switch to

Agent

mode. Click the 

tool icon

at the bottom of the Copilot panel. Scroll through the list — your Sitecore Local server should appear with its tools registered beneath it. If it doesn’t show up, restart VSCode, reopen Copilot, and click the tool icon again.

4. Test the connection

Type the following prompt in Copilot agent mode:

  • Test Sitecore MCP connection works by bringing back the default home item from Sitecore

Copilot will ask permission before running — click

Continue

If the connection is working, you’ll see your Sitecore Home item data come back directly inside the Copilot response. That moment is genuinely satisfying.

Alternative: clone and run via NPM instead of NPX

If you prefer not to rely on NPX fetching the package on demand, you can clone and run the server directly:

git clone https://github.com/Antonytm/mcp-sitecore-server.git
cd mcp-sitecore-server
npm install
npm run build
npm start

Solving common issues

Too many tools error (on a free Copilot account)

Go to the tool icon in Copilot and deselect the default built-in tools, leaving only the Sitecore MCP Server tools active. Free tier accounts have a tool limit per request.

TLS / connection error connecting to local Sitecore

Add the following to the env section of your mcp.json:

"NODE_TLS_REJECT_UNAUTHORIZED": "0"

⚠️ Important: Only use NODE_TLS_REJECT_UNAUTHORIZED: "0" for local development instances. Never use this setting for remote or production servers.

Item API not responding

Your local Sitecore instance may need a config patch to allow HTTP access for the Item Service. You need to set Sitecore.Services.AllowToLoginWithHttp to true and configure the appropriate security policy. The full config patch XML is in the Flux Digital guide.

What this stage proved

By the end of this setup, I had GitHub Copilot in my IDE talking directly to a local Sitecore XP instance — browsing items, querying content, checking data — all through natural language prompts. No Content Editor. No manual navigation. Just a prompt and a result.

It worked well. But I noticed that Anton’s server was a general-purpose Sitecore administration tool. What I actually wanted was something more focused — tools shaped around my specific daily reporting needs on a real project. That is what Blog 4 is about.

Till then, Happy Sitecoring! 😊

Monday, July 20, 2026

Your First MCP Server in .NET — From Zero to Hello Tool


Hello Sitecorian Community! 👋

Before building anything Sitecore-specific, I needed to understand MCP from the ground up. Jumping straight to a Sitecore integration without that foundation would mean debugging two things at once — the Sitecore layer and the MCP layer. That is a reliable recipe for confusion.

So step one was this: build the smallest possible working MCP server in .NET, connect it to GitHub Copilot, and see a single tool call succeed. That mental model turned out to be everything that followed.

The guide I followed was Microsoft’s official quickstart:
📘 Create a minimal MCP server using C# — Microsoft Learn

Understanding the project structure first

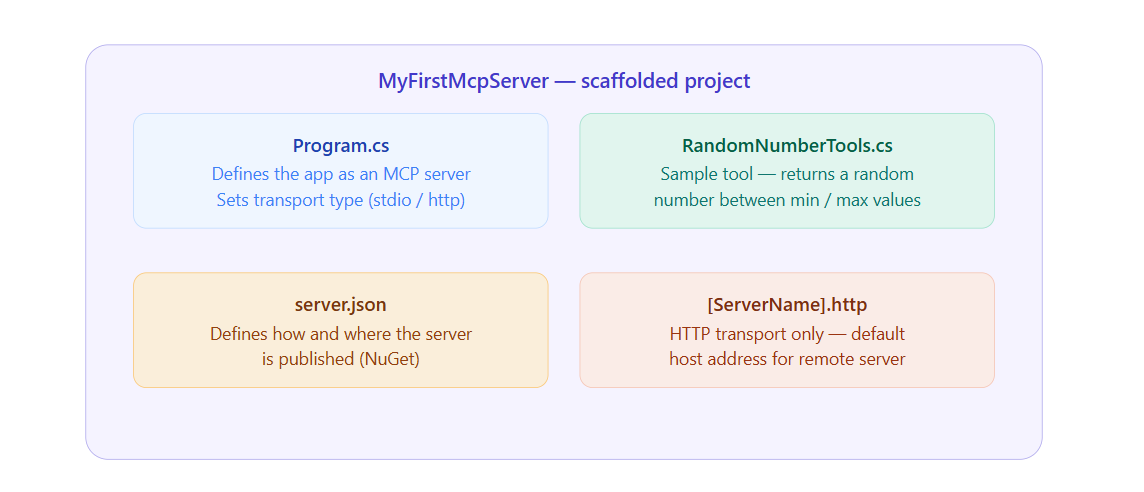
Before diving into the steps, it helps to understand what a .NET MCP server project actually contains. The template generates four key files:

MyFirstMcpServer — scaffolded projectProgram.csDefines the app as an MCP serverSets transport type (stdio / http)RandomNumberTools.csSample tool — returns a randomnumber between min / max valuesserver.jsonDefines how and where the serveris published (NuGet)[ServerName].httpHTTP transport only — defaulthost address for remote server

The four files generated by the MCP Server App template. Program.cs and the tools file are the two you'll spend most time in

Prerequisites

  • .NET 10.0 SDK — required; the MCP project templates won’t install on earlier versions
  • Visual Studio Code
  • C# Dev Kit extension for VSCode (ms-dotnettools.csdevkit)
  • GitHub Copilot extension for VSCode (GitHub.copilot)
  • A NuGet.org account — only if you want to publish; skip for local experiments

Note: The Microsoft.McpServer.ProjectTemplates package is currently in preview. It works well, but always check the official docs for the latest before you start.

Step-by-step setup

Step-by-step setup

  1. Install the MCP Server project templateOpen a terminal and run:
dotnet new install Microsoft.McpServer.ProjectTemplates

This adds the MCP Server Apptemplate to your .NET tooling. You won’t see it in the project list until this step is done. .NET 10.0 SDK or later is required.

2. Create the project in VSCode

Open VSCode and bring up the Command Palette (Ctrl+Shift+P on Windows/Linux, Cmd+Shift+P on Mac). Type .NET: New Project and select it. In the template list that appears, search for

MCP Server App and select it. Choose a location, give your project a name — I used MyFirstMcpServer — and press Enter.

3. Choose your template optionsYou’ll be prompted to configure:

  • Framework: Select .NET 10
  • Transport type: Choose stdio(local process) for your first experiment. It communicates via standard input/output and needs no web hosting setup. 
  • Choose http only if you need a remotely accessible server
  • Native AOT / Self-contained: Leave as defaults for now

4. Read the scaffolded code before changing anything

VSCode opens your new project. Spend five minutes reading through Program.cs and RandomNumberTools.cs before modifying anything. The template gives you a working server with a sample tool already registered. That structure — the attribute decoration, the description, the method signature — is the pattern you will repeat for every tool you build later.

5. Connect Copilot and test a tool call 

Open GitHub Copilot in VSCode and switch it to Agent mode. 

Click the tool icon at the bottom of the Copilot panel. Your MCP server should appear in the list of available tools. If it doesn’t, restart VSCode and try again. Once it appears, type a prompt that exercises the sample tool. Copilot will ask permission to run it — click Continue. When you see the tool execute and return a result inside the Copilot response, you have done it.

6. Update PackageId if publishing to NuGet (optional)

If you want to publish your server as a NuGet package, update the <PackageId> in your .csproj to something unique:

<PackageId>YourNuGetUsername.SampleMcpServer</PackageId>

Not required for local use.

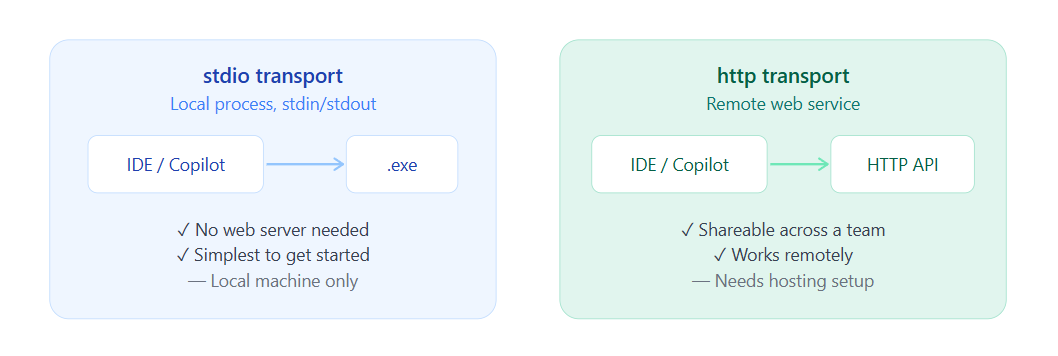
What the transport types actually mean

stdio transportLocal process, stdin/stdoutIDE / Copilot.exe✓ No web server needed✓ Simplest to get started — Local machine onlyhttp transportRemote web serviceIDE / CopilotHTTP API✓ Shareable across a team✓ Works remotely — Needs hosting setup

stdio vs http transport. For a first experiment, stdio is the right choice. Switch to http when you need to share the server across a team or access it remotely

Three things this exercise taught me

Tools are the entire model. An MCP server is a collection of tools. Each tool has a name, description, typed inputs, and a return value. The AI model reads those descriptions to decide which tool to call. That is the whole protocol — no magic underneath.

The transport layer is a deployment decision, not a logic decision. stdio vs http changes how clients connect to your server. The tools themselves work identically in both modes. Start with stdio locally; reach for http when you need remote access or team sharing.

Clear descriptions drive reliable routing. In the sample tool, the description is short and precise. I learned the hard way later that vague descriptions cause the AI to call the wrong tool or ignore it entirely. Write descriptions as if you are explaining to a teammate what this function does and when exactly to use it.

Quick tip: after getting the sample tool working, try modifying the RandomNumberTools.cs description to something vague, then ask Copilot the same prompt. You will see immediately how much description quality affects routing reliability.

Till then, Happy Sitecoring! 😊

Thursday, May 14, 2026

XM Cloud Migration and API Patterns — Real Challenges We Faced and How We Fixed Them

Hello Sitecorian Community,

If you’ve worked on a Sitecore XM Cloud migration project, you’ve probably faced something like this:

“The architecture is signed off. The team starts building. Three weeks in, we discover 80% of the existing MVC components won’t work. The estimate needs to triple.”

This is not a rare situation. It happens regularly because most migration guides focus on what to do at a high level — not the specific things that will actually bite you mid-sprint.

In this post, I want to share the real challenges we’ve encountered on XM Cloud migration projects, and the API integration patterns that break in production even when they work fine in dev.

The Real Problem With XM Cloud Migrations

The first thing to be clear about:

Migrating from Sitecore 10 MVC to XM Cloud is not an upgrade. It is a full re-platforming to a headless, SaaS architecture.

Here is what changes at the architecture level:

Traditional Sitecore MVCXM Cloud (Headless)Controller renderings + Razor viewsJSS components in Next.js / ReactServer-side rendering and logicFrontend-driven renderingCD server for content deliveryExperience Edge CDN — no CD serverxDB-driven personalizationRule-based only, or Sitecore PersonalizeTight coupling with .NETAPI-first, decoupled architecture

Challenge 1: Every MVC Rendering Needs to Be Rebuilt

This is consistently the largest effort in any migration.

Controller renderings, Razor views, rendering parameters, server-side visibility logic — all of it needs to become a JSS component. There is no conversion path. You rebuild using the Headless SXA information architecture:

  • Tenant → Site → Pages
  • Page Designs and Partial Designs replace layouts
  • All rendering logic moves to the frontend
  • Custom placeholder logic needs to be redesigned — older nesting patterns don’t map cleanly

⚠️ If your existing solution is not SXA-based: adopting Headless SXA becomes an additional workload on top of the component rebuild. You need to re-map your entire solution into the SXA tenant/site/page structure. Budget for this separately.

Challenge 2: Personalization Cannot Be Migrated — It Needs to Be Redesigned

This is the one that surprises most teams.

XP personalization was powered by xDB analytics. XM Cloud does not have xDB. The personalization rules you built on XP will not work in XM Cloud. Do not try to port them — the engines are fundamentally different.

What we did instead:

  • Audited every existing personalization rule
  • Identified the business intent behind each rule
  • Redesigned using XM Cloud built-in rules for simple cases (geo, auth, device type)
  • Used Sitecore Personalize for anything requiring behavioral targeting or multi-source decisioning

This needs to be a separate scoping conversation with the client — not something discovered during sprint three.

Challenge 3: Bad Content Migrates Perfectly

The tooling (Sitecore CLI, Content Serialization) handles the mechanical migration well. What it cannot fix is content that was already messy.

Common issues we see after migration:

  • Items losing workflow state or associations
  • Media references breaking because folder casing changed
  • Personalize dependencies still embedded in content items
  • Old placeholder configurations causing component mapping errors
  • Inconsistent templates creating template explosion in the new environment

✅ What helped us: Run a full content audit before any migration script runs. Agree a freeze period with the client — no new content during the audit and initial migration window. It sounds disruptive but saves weeks of cleanup later.

Challenge 4: The C# Team and Next.js

Most established Sitecore teams are strong in C#. All XM Cloud documentation and official tooling assumes you are building with Next.js.

The ASP.NET Rendering SDK exists but you will be off the golden path — fewer examples, less community support, and real limitations when integrating with Sitecore Personalize.

What helped us: We ran a Next.js learning sprint before the project kicked off. Getting two or three developers comfortable with React, the JSS SDK, and the Next.js App Router before sprint one paid back immediately. Don’t skip this step.

About SitecoreAI Pathway

Sitecore announced SitecoreAI Pathway at Symposium 2025. Here is what we know from official sources:

  • Handles content migration only — not code. The rendering rebuild is still a separate effort
  • Up to 70% faster content migration timelines — around 100,000 pages migrated during beta
  • Included in Sitecore 360 subscriptions at no extra cost
  • Supports Sitecore XP migrations now, rolling out to Adobe/Optimizely/Contentful
  • AI + human-in-the-loop — you validate and correct what the AI missed

If your client is on Sitecore 360, include a Pathway assessment in your discovery phase.

API Integration — The Patterns That Break in Production

Moving to API integration patterns on Sitecore projects. Here is a scenario we’ve encountered more than once:

“The integration with the CRM worked perfectly in dev and UAT. On go-live day, under real traffic, it starts timing out. Logs point to Experience Edge GraphQL being hammered.”

API failures on Sitecore projects are rarely about writing the wrong code. They are almost always about not fully understanding how Experience Edge works.

How Experience Edge Actually Delivers Content

Experience Edge is Sitecore’s globally distributed, CDN-backed GraphQL API. Your Next.js rendering host fetches content from Edge — not directly from the CM.

Two critical things that follow from this architecture:

  • Custom Content Resolvers do not execute on Edge. They run at publish time only. If your resolver needs runtime context (visitor’s browser, query string, session data) — that is not supported on Edge. Redesign around it.
  • Content not appearing on the live site? Check the publish-to-Edge pipeline first, not your Next.js code. A publishing job that fails silently during busy editorial periods is a common cause — set up infra-level alerting on Edge publish failures.

Caching Strategy — Don’t Treat All Data Sources the Same

The pattern that breaks most often: a page pulls from XM Cloud content, a product API, and CDP profile data — all with the same caching approach. Change frequency is completely different for each source:

Data SourceChange FrequencyCorrect StrategyXM Cloud contentHours to daysISR or full static generation (Next.js)Product / commerce dataMinutes to hoursServer-side with short revalidationCDP profile / audience dataPer sessionClient-side fetch after page load — cannot be edge-cached

The Webhook Write-Back Problem

A common integration pattern now with SitecoreAI: a webhook fires → Azure Function calls an AI service → result writes back to Sitecore via the Management API.

The silent failure we hit: the Management API respects workflow state. If the agent tries to write to an item in an approved or published workflow state, and the API token does not have override permissions — it fails silently. No error in logs. No exception thrown. Just nothing happens.

# Always test write-back against every workflow state:
# Draft state → write allowed ✅
# Awaiting review → depends on token permissions ⚠️
# Approved state → fails silently without override ⚠️
# Published state → fails silently without override ⚠️

✅ Fix: Add Management API write-back tests for every workflow state your implementation uses. Not just the happy path. This test will save you a go-live incident.

Use Sitecore Connect Before Writing Custom Code

Before writing any custom integration from scratch, check Sitecore Connect first. It ships with pre-built connectors for Salesforce, OpenAI, Gemini, and others. Connect integrations operate within SitecoreAI’s governance and audit model. A custom webhook pipeline does not. For enterprise clients with compliance requirements around data flows — this distinction matters.

Why This Helped Our Team

Before understanding these patterns:

  • Go-live issues were hard to diagnose — wrong place to start debugging
  • Multi-source pages had inconsistent behaviour under load
  • Webhook write-backs silently failed in certain workflow states

After:

  • Published pipeline alerts catch Edge failures before users report them
  • Each data source has a caching strategy matched to its change frequency
  • Integration test matrix covers all workflow states explicitly

Final Thoughts

XM Cloud migration and API integration both require understanding the underlying architecture deeply — not just following the official documentation. The documentation tells you what things are. Real project experience tells you where the edges are.

If you are planning an XM Cloud migration, run a full rendering inventory and content audit before committing to a timeline. Those two things will tell you more about the true scope than any architecture review.

Stay tuned for more Sitecore-related articles, tips, and tricks to enhance your Sitecore experience.

Till then, happy Sitecoring! 😊

Please leave your comments or share this article if it’s useful for you!

Saturday, April 4, 2026

Cleaning Up Sitecore Versions at Scale: A Practical PowerShell Approach


Hello Sitecorian Community,

If you’ve worked on a large Sitecore implementation, you’ve probably seen this happen:

Items with 10, 20, sometimes even 50+ versions sitting in the system.

At first, it doesn’t seem like a big deal. But over time:

  • Content trees become heavier
  • Database size increases
  • Performance can degrade
  • Content management becomes harder

And eventually, the question comes up:

How do we safely clean up old versions without breaking anything?

The Real Problem

In enterprise setups (like ours managing hundreds of websites), version sprawl is very common.

Typical scenarios:

  • Frequent content updates create multiple versions
  • Publishing pipelines don’t remove old versions
  • Editors rarely clean up older versions manually
  • Multiple languages multiply the problem

Manually deleting versions is not scalable and also risky.

What We Needed

We wanted a solution that:

  • Works recursively across content trees
  • Supports all languages
  • Keeps only the relevant versions
  • Deletes only safe-to-remove versions
  • Can run in dry-run mode before actual cleanup

Two Cleanup Strategies We Implemented

We ended up building two PowerShell scripts using Sitecore PowerShell Extensions (SPE) depending on the use case.

1️⃣ Basic Cleanup: Keep Latest 3 Versions

This is the simplest and most commonly used approach.

Behavior

For an item with versions:

10, 9, 8, 7, 6

The script will:

  • Keep → 10, 9, 8
  • Delete → 7, 6

If an item has 3 or fewer versions, it is skipped.

When to Use

  • General cleanup
  • Non-workflow-driven environments
  • Quick version reduction across large trees

Core Logic

$allVersions = Get-Item -Path $itemPath -Language $language -Version * |
Sort-Object { [int]$_.Version.Number } -Descending
$versionsToKeep = $allVersions | Select-Object -First 3
$versionsToDelete = $allVersions | Select-Object -Skip 3
foreach ($oldVersion in $versionsToDelete) {
$oldVersion.Versions.RemoveVersion()
}

2️⃣ Smart Cleanup: Keep Latest 3 Approved Versions

This is a workflow-aware cleanup, which is much safer for content-heavy environments.

Behavior

Example:

Versions:
10, 9, 8, 7, 6, 5, 4, 3, 2, 1

Case 1

Approved versions: 10, 9, 8
→ Keep: 10, 9, 8
→ Delete: everything else

Case 2

Approved versions: 10, 9, 7
→ Keep: 10, 9, 7
→ Delete: 8, 6, 5, 4, 3, 2, 1

Case 3

Approved versions: 10, 7
→ Skip (not enough approved versions)

Key Implementation Details

🔁 Recursive Execution

The script runs across:

  • Root item
  • All children
  • All descendants

🌍 Multi-language Support

Each language version is processed independently.

🧪 Dry Run Mode

Always start with:

$dryRun = $true

Then switch to:

$dryRun = $false

GitHub Repository

You can find both scripts here:

It includes:

  • Basic version cleanup script
  • Workflow-based cleanup script
  • Safe dry-run execution

Why This Helped Us

Before this:

  • Version cleanup was manual and inconsistent
  • Content trees became bloated
  • Investigations were harder

After this:

  • Cleanup became automated and safe
  • We reduced unnecessary versions significantly
  • Improved overall content hygiene

When Should You Run This?

  • After large deployments
  • As part of regular maintenance jobs
  • During performance optimization
  • Before database cleanup activities

Reference screenshot:


Final Thoughts

In large Sitecore environments, version management is often overlooked, but it plays a big role in performance and maintainability.

These scripts helped us:

  • Keep content clean
  • Reduce noise in version history
  • Maintain only what actually matters

If you’re dealing with version-heavy content trees, this approach can save a lot of time and effort.

Stay tuned for more Sitecore-related articles, tips, and tricks to enhance your Sitecore experience.

Till then, happy Sitecoring! 😊

Please leave your comments or share this article if it’s useful for you!

Monday, March 16, 2026

Debugging Sitecore Publishing Issues at Scale: A Simple PowerShell Tool That Saved Our Team Hours

Hello Sitecorian Community,

If you’ve worked with Sitecore in a large multi-site environment, you’ve probably faced this situation.

Someone reports:

“The content is updated in CMS but not visible on the website.”

And the investigation begins.

You start checking:

  • Is the item published?
  • Does it exist in the web database?
  • Is the revision updated?
  • Did the child items publish?
  • Is it a language version issue?

Now imagine doing this when you manage 300+ websites and hundreds of items move across environments every day.

That’s the reality our team deals with.

The Real Problem

Publishing issues in Sitecore are rarely obvious.

Sometimes:

  • The item exists in master but not in web
  • The item exists in both but revision IDs don’t match
  • The updated date differs
  • Only the parent item published, but children didn’t
  • Deployment pipelines move items but something silently fails

When troubleshooting these issues manually, developers often:

  1. Open master database
  2. Inspect the item
  3. Switch to web database
  4. Check again
  5. Compare Revision IDs
  6. Repeat for multiple items or entire trees

Doing this repeatedly across dozens (or hundreds) of items quickly becomes slow, frustrating, and error-prone.

Our Daily Reality

Our platform supports 300+ websites, and content changes constantly move between databases and environments.

During deployments or publishing validations, the most common question is:

Did the content actually publish correctly?

Finding that answer quickly is critical for developers, QA teams, and support engineers.

The Tool We Built

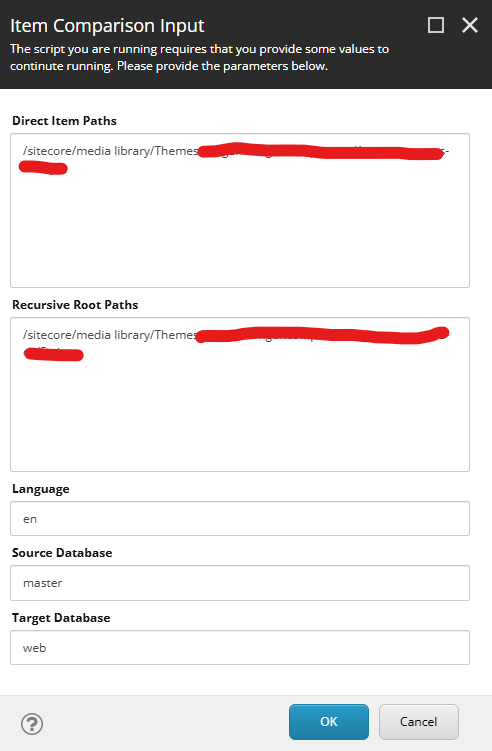
To simplify this process, we built a Sitecore PowerShell Extensions (SPE) script that compares items between two databases.

We call it:

Sitecore Publishing Validation Tool

GitHub Repository (script available here):
https://github.com/gaurarun777/SitecorePowerShell/blob/main/2026/sitecore-publishing-validation-tool.ps1

This script allows developers to:

  • Provide specific item paths
  • Provide root paths for recursive validation
  • Compare two databases (for example master vs web)
  • Validate Revision ID
  • Validate Updated Date
  • Detect missing or mismatched items

Instead of manually switching between databases, the script produces a comparison grid instantly.

The PowerShell Script

Below is the core idea behind the script used in our Sitecore environment.

# Simplified comparison logic
$sourceItem = Get-Item "${sourceDatabase}:$path" -Language $language
$targetItem = Get-Item "${targetDatabase}:$path" -Language $language
$sourceRevision = $sourceItem["__Revision"]
$targetRevision = $targetItem["__Revision"]
$sourceUpdated = $sourceItem["__Updated"]
$targetUpdated = $targetItem["__Updated"]
if ($sourceRevision -ne $targetRevision) {
$status = "Revision Mismatch"
}
elseif ($sourceUpdated -ne $targetUpdated) {
$status = "Updated Date Mismatch"
}
else {
$status = "Match"
}

The script loops through item paths and recursively scans content trees to validate publishing results between databases.

Developers can then quickly identify:

  • Items that failed to publish
  • Items with outdated revisions
  • Missing items in the target database
  • Partial publishing issues within item trees

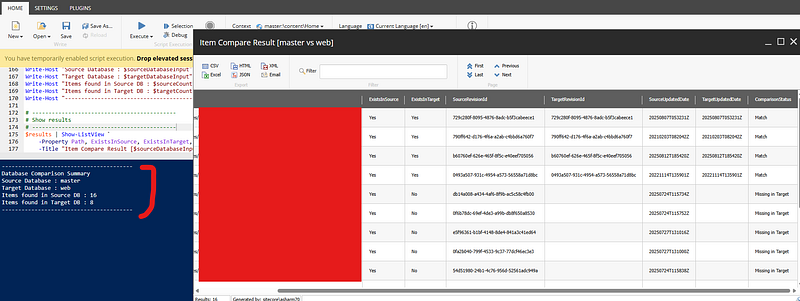
What the Output Looks Like

The script generates a comparison grid showing:

  • Item Path
  • Exists in Source DB
  • Exists in Target DB
  • Source Revision ID
  • Target Revision ID
  • Updated Dates
  • Comparison Status

Example statuses:

  • Match
  • Revision Mismatch
  • Updated Date Mismatch
  • Missing in Target
  • Missing in Source

This makes it extremely easy to spot publishing issues.

Why This Helped Our Team

Before using this tool:

  • Troubleshooting publishing issues could take 30–60 minutes
  • Developers had to manually inspect each item
  • Recursive tree validation was tedious

Now:

  1. Paste item paths
  2. Select databases
  3. Run the script

Within seconds we can see exactly where publishing failed.

Why Sitecore PowerShell Extensions Is So Powerful

One thing I really appreciate about Sitecore PowerShell Extensions is how quickly developers can build practical operational tools.

With a few lines of PowerShell, you can automate tasks that would otherwise take significant manual effort.

SPE is extremely useful for:

  • Content validation
  • Publishing verification
  • Bulk content operations
  • Content audits
  • Operational automation

Final Thoughts

When working with large Sitecore implementations, operational tooling becomes just as important as development.

Sometimes the biggest productivity improvements come from small internal tools that solve daily problems.

This publishing validation script became one of those tools for our team.

If you manage a large Sitecore environment, I highly recommend building small utilities with Sitecore PowerShell Extensions to simplify repetitive tasks.

They might save your team more time than you expect.

Reference Screesnhots:


If you’re interested in trying the script, you can find it here:

GitHub:
https://github.com/gaurarun777/SitecorePowerShell/blob/main/2026/sitecore-publishing-validation-tool.ps1

Would love to hear what internal tools or automation scripts your Sitecore teams are using to improve daily operations.

Stay tuned for more Sitecore-related articles, tips, and tricks to enhance your Sitecore experience.

Till then, happy Sitecoring! 😊

Please leave your comments or share this article if it’s useful for you!

Sunday, March 1, 2026

Understanding Sitecore Cache Behavior: Why Your PowerShell Updates Don't Appear (And How to Fix It Properly)

 Hello Sitecorian Community,

After 11 years architecting Sitecore solutions, I still see this question pop up regularly: “Why doesn’t my PowerShell script update show in the Content Editor until I clear cache?” It’s one of those things that trips up even experienced developers, especially when moving to containerized environments.

Let me walk you through what’s actually happening under the hood, and more importantly, how to handle it properly in enterprise implementations.

The Classic Scenario

You’re probably familiar with this pattern:

 $item = Get-Item "master:/sitecore/content/Home"
$item.Editing.BeginEdit()
$item["Title"] = "Updated via PowerShell"
$item.Editing.EndEdit()

Script executes clean. Database row updates. But Content Editor shows stale data. Refresh the browser — sometimes the new value appears, sometimes it doesn’t. Clear cache, everything’s suddenly correct.

If you’re scratching your head wondering why this happens, you’re thinking about Sitecore wrong. Let me explain.

Sitecore’s Memory-First Architecture

The key thing to understand: Sitecore is designed to avoid database calls at all costs. This isn’t a side effect — it’s the core architectural decision that lets Sitecore scale to millions of items.

Here’s what actually happens when Sitecore needs to retrieve an item:

First, check Item Cache: Sitecore looks for a fully constructed Sitecore.Data.Items.Item object in the Item Cache. If it’s there, return it immediately. Done. No further lookups needed.

If not in Item Cache, check Data Cache components: The Data Cache stores the raw building blocks:

  • ItemDefinition (ID, name, template ID, parent ID)
  • FieldList (which fields exist for this item)
  • Individual field values

If these components exist, Sitecore reconstructs the Item object from them, caches it in Item Cache, and returns it.

Finally, query the database: If the Data Cache doesn’t have what’s needed, Sitecore hits the [Items], [SharedFields], [UnversionedFields], and [VersionedFields] tables, loads the data, populates both Data Cache and Item Cache, then returns the item.

When you update an item via PowerShell, you’re writing directly to those database tables. But you’re not touching Item Cache or Data Cache. Your PowerShell script bypasses the entire ItemProvider event pipeline. No item:saved event fires. No cache invalidation events propagate. The EventQueue table doesn’t get new records. From Sitecore’s perspective, nothing changed.

The Multi-Cache Problem

This is where it gets interesting architecturally. Sitecore doesn’t have a single monolithic cache — it has multiple specialized caches that work together:

Item Cache: Stores complete Item objects (includes all fields, versions, language data)

Data Cache: Stores the raw components used to build items:

  • ItemDefinition objects
  • FieldList objects
  • Individual field values

StandardValues Cache: Stores template field default values (consulted when an item doesn’t have its own value for a field)

Path Cache: Maps item paths to GUIDs for fast lookups

AccessResult Cache: Stores security filtering results

Registry Cache: Configuration and settings

Here’s the problem: after a PowerShell update, you might have:

  • Item Cache: Contains old Item object with stale field values
  • Data Cache: Still has old field value entries
  • Path Cache: Correct (maps path to ID, which didn’t change)
  • Database: Has new values

When Sitecore retrieves your item, depending on cache state, you get inconsistent results. Two requests for the same item can return different data based on whether they hit Item Cache or rebuild from Data Cache or query the database.

I’ve debugged this with dotTrace profiler, and watching the cache hit patterns is fascinating. Here’s what actually happens:

// Request 1: Gets served from Item Cache
var item1 = Sitecore.Context.Database.GetItem(itemId);
// Returns cached Item object with old "Title" value
// Request 2: Item Cache entry was evicted, rebuilds from Data Cache
var item2 = Sitecore.Context.Database.GetItem(itemId);
// Rebuilds Item from field data, still sees old cached field values
// Request 3: Data Cache entries also evicted, hits database
var item3 = Sitecore.Context.Database.GetItem(itemId);
// Finally sees new value from database, then caches it

Why Docker Amplifies This

In traditional deployments, you might not notice this much. In containerized environments, it becomes painfully obvious. Here’s why:

Memory pressure: Containers typically run with 2–4GB RAM allocations versus 32GB+ on VMs. Cache eviction happens constantly.

Isolated process spaces: Each container has completely independent memory. CM and CD don’t share anything. In Kubernetes, you might have 3 CD replicas — each with its own cache state showing different versions of your content.

Frequent restarts: During development, containers restart constantly. Every restart = cold cache = more visible inconsistency.

No distributed cache by default: Unless you’ve implemented Redis or another distributed cache, each container is an island.

I’ve architected several Kubernetes-based Sitecore implementations, and this is where developers get bitten hard. They’ll make a PowerShell update on CM, publish it, then hit different CD pods and see different content. It’s not a bug — it’s architecture.

What Actually Happens in the UI

When you edit through Content Editor or Experience Editor, Sitecore triggers the full save pipeline through its event system. The item:saved event fires and propagates through multiple registered handlers that:

  1. Remove the item from Item Cache
  2. Clear Data Cache entries for that item ID
  3. Trigger StandardValues Cache clearing if it’s a template
  4. Add entries to the EventQueue table for remote cache invalidation across CM instances
  5. Update link database and search indexes
  6. Fire any custom event handlers you’ve registered

PowerShell’s BeginEdit()/EndEdit() methods skip all of this. They call directly into Sitecore.Data.DataProviders and write to the database. Fast, efficient, but completely bypasses the event pipeline — which means no automatic cache invalidation.

This is by design. PowerShell gives you low-level data access for performance. The trade-off is you’re responsible for cache management yourself.

Why Auto-Clearing Would Break Everything

Some developers ask: “Why doesn’t Sitecore just clear cache after every script operation?”

Think about the implications. I recently wrote a migration script that updated 50,000 items. If Sitecore cleared cache after each operation:

  • 50,000 cache clear operations
  • 50,000 cache rebuild operations on next access
  • Memory thrashing from constant allocations/deallocations
  • GC pressure from all that object churn
  • Potential OutOfMemoryException on large operations

On a production instance with millions of items, this would tank performance. Bulk operations would become impossibly slow. Memory usage would spike uncontrollably.

Sitecore’s design choice: give architects control. Want aggressive cache clearing? Do it. Want to batch updates and clear once? Do that. Want selective clearing? You got it.

The Pattern I Actually Use Now

After years of getting burned by this, here’s how I write PowerShell scripts now:

# Keep track of what I touched
$affectedItems = @()
# Do the actual updates
$items = Get - ChildItem "master:/sitecore/content/Home" - Recurse
foreach($item in $items) {
if ($item["Title"] - eq "OldValue") {
$item.Editing.BeginEdit()
$item["Title"] = "NewValue"
$item.Editing.EndEdit()
$affectedItems += $item
}
}
# Clear ONLY the items I changed
foreach($item in $affectedItems) {
[Sitecore.Data.Caching.CacheManager]::GetItemCache($item.Database).RemoveItem($item.ID)
}
# Publish to CD
foreach($item in $affectedItems) {
Publish - Item - Item $item - Target "web" - PublishMode Smart - Recurse: $false
}


This is way better than nuking all caches. You’re surgically removing just the stuff you changed. The rest of the cache stays intact, site stays fast, everyone’s happy.

Note: In most cases, clearing ItemCache alone is sufficient. DataCache entries are secondary and typically rebuild automatically. If you need more thorough cache clearing, you can add DataCache key pattern matching, but it’s rarely necessary for typical content updates.

Stuff That’s Saved Me Hours of Debugging

A few tricks I’ve picked up over the years:

Watch the EventQueue table: If you’re running multiple CMs (like in Kubernetes), check your Core database’s EventQueue table. I’ve seen situations where events just stop propagating between instances. Cache invalidation events pile up, never get processed, and suddenly different CMs show different content.

Turn on cache logging during dev: Just temporarily, because it’s chatty. But seeing exactly what’s getting cached and cleared makes everything make sense.

Use the Sitecore diagnostics tools: There’s a Support Diagnostics module that shows you what’s in cache right now. It’s like X-ray vision for understanding what’s happening.

Check Application Insights: On newer Sitecore versions, you can actually see cache hit/miss ratios. If your hit ratio is low, something’s wrong with your cache strategy.

The Publishing Thing Nobody Mentions

Here’s something that bit me hard when we went headless: clearing CM cache means nothing to your CD instances until you publish.

In the old days, some devs (not me, I swear) would point CD at the master database. Terrible practice, but it meant updates showed up everywhere immediately. In a proper architecture with separate CM/CD? Publishing isn’t optional.

And Publishing Service has its own cache quirks too. I’ve seen situations where the publishing job queue gets backed up, and suddenly your CD is minutes behind CM even though you’re publishing. Fun times.

What I Wish Someone Had Told Me Years Ago

Look, after writing probably hundreds of PowerShell scripts for Sitecore — migrations, bulk updates, automated content fixes — here’s what I’ve learned:

PowerShell changes the database, not the cache. You’re reaching under Sitecore’s hood and modifying data directly. Sitecore doesn’t know you did that unless you tell it.

Cache clearing isn’t overhead, it’s part of the job. Budget for it. Plan for it. Do it.

In real architectures, you HAVE to publish. Don’t rely on CM and CD magically staying in sync. They won’t.

Clear what you actually changed. Don’t be lazy and nuke everything unless you really need to.

Test in realistic environments. If your dev environment has unlimited memory and production doesn’t, you won’t see cache issues until it’s too late.

Once I stopped thinking of Sitecore like a traditional CMS and started understanding it’s really a memory-first system that happens to persist to a database, everything clicked. The cache isn’t misbehaving — it’s doing exactly what it’s supposed to. You just need to work with it.

These days, when a junior dev comes to me saying “my PowerShell script isn’t working,” I already know what they forgot. We all learn this lesson eventually. Hopefully, this helps you learn it a bit faster than I did.

Stay tuned for more Sitecore-related articles, tips, and tricks to enhance your Sitecore experience.

Till then, happy Sitecoring! 😊

Please leave your comments or share this article if it’s useful for you!