Showing posts with label automation. Show all posts

Tuesday, July 14, 2026

MCP — The Protocol the Sitecore Community Is Talking About

Hello Sitecorian Community! 👋

If you have been following Sitecore community conversations lately, one acronym keeps coming up: MCP. If you have heard the term but not yet found time to dig into it properly — this four-part series is for you.

I have already written a full recap of SUGCON India 2026 in Delhi — the announcements, the sessions, the community energy. I will not repeat all of that here. But one topic from those two days sent me down a rabbit hole I haven’t climbed out of since, and that is what this series documents.

That topic was Model Context Protocol — MCP.

So what actually is MCP?

MCP — Model Context Protocol — is an open protocol that defines how AI models communicate with external tools and data sources in a structured, standardised way. The core shift it represents is this: instead of an AI assistant only being able to chat, it can also act — querying systems, reading live data, triggering operations — through a defined interface.

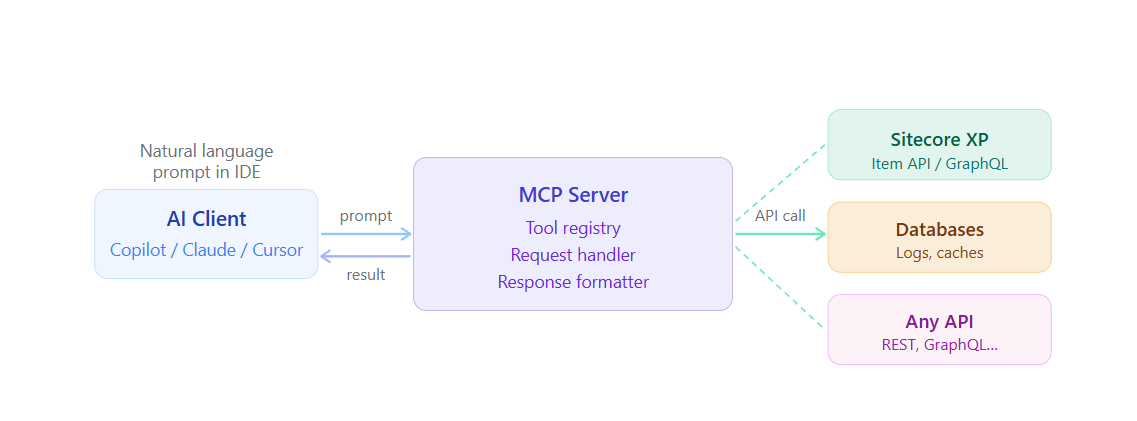
Think of it as a universal adapter between your AI client and any external system. The AI model discovers available tools, reads their descriptions, and calls them in response to a natural language prompt. No hardcoded API client code. No custom integration per tool. One protocol, any system that implements it.

AI ClientCopilot / Claude / CursorpromptMCP ServerTool registryRequest handlerResponse formatterresultAPI callSitecore XPItem API / GraphQLDatabasesLogs, cachesAny APIREST, GraphQL…Natural languageprompt in IDE

 MCP high-level flow: a natural language prompt triggers the MCP client, which routes through the server to the target system and returns structured results

The three things that make MCP relevant for Sitecore developers right now

1. Sitecore’s own direction

At SUGCON India 2026, Sitecore announced Marketer MCP powered by Agent API — the ability to access Sitecore marketing capabilities directly through AI environments like Claude, Cursor, and other LLM-powered tools. This is not a roadmap item. It is Sitecore signalling that MCP is a first-class integration path.

2. The community built it first — for XP

In May 2025 — before the SUGCON announcement — community contributor Anton Tishchenko released an open-source Sitecore MCP server on GitHub: github.com/Antonytm/mcp-sitecore-server. This server connects to Sitecore XP via the Item Service API and GraphQL, and exposes tools for content operations, user and role management, index control, and database and log access. The community did not wait for an official product — it built the bridge itself.

3. The .NET angle for developers like me

Microsoft published an official quickstart for building MCP servers in C# using the C# SDK for MCP. The same language stack we use for Sitecore development is now a first-class way to build AI tooling. That alignment made experimentation feel natural rather than foreign.

What MCP actually enables — in practical terms

Without MCP, an AI assistant in your IDE can only work with the code in front of it. With an MCP server connected to your Sitecore instance, it can also:

  • Browse the content tree and retrieve specific items
  • Check the publishing queue without opening the Sitecore admin
  • Query workflow states across a template type
  • Check which items are currently locked and by whom
  • Read logs and surface errors without leaving your editor

All of this through a natural language prompt. No tab-switching, no manual navigation, no copy-pasting item IDs.

Why this matters more than it sounds: Sitecore developers already know their IDE. The friction of context-switching to a browser, logging into the admin UI, navigating to the right screen — that adds up across a working day. MCP removes that friction without changing the way Sitecore works.

How MCP tools work — a closer look

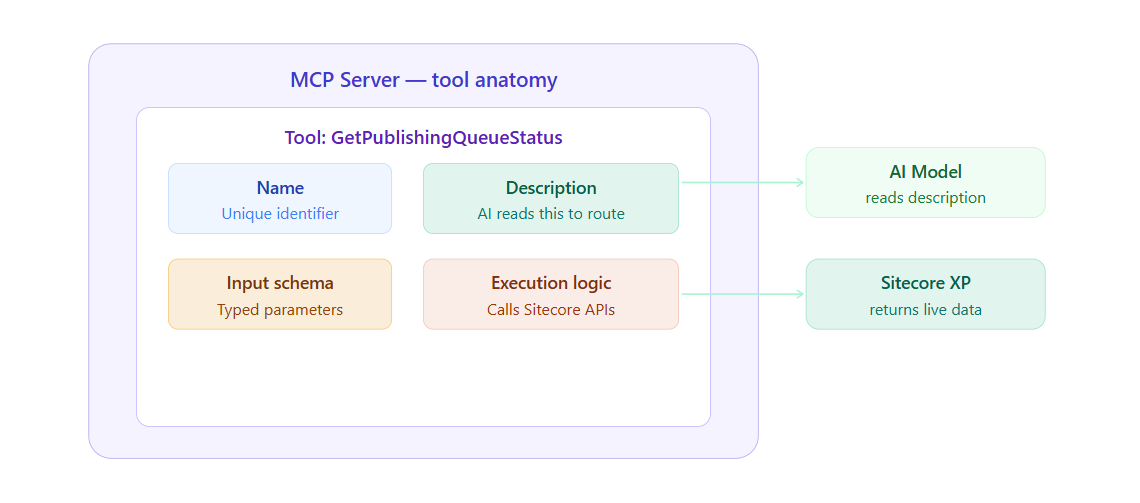
Every MCP server is essentially a collection of tools. Each tool is a named function with a description and typed inputs. The AI model reads those descriptions to decide which tool to call when responding to a prompt.

MCP Server — tool anatomyTool: GetPublishingQueueStatusNameUnique identifierDescriptionAI reads this to routeInput schemaTyped parametersExecution logicCalls Sitecore APIsAI Modelreads descriptionSitecore XPreturns live data

Anatomy of a single MCP tool. The AI reads the description to decide whether to call the tool; the execution logic does the actual work against Sitecore

What is coming in this series

BlogWhat it coversBlog 1 (this one)What MCP is, why it matters for Sitecore developers, and the landscapeBlog 2Building a minimal MCP server in .NET using Microsoft’s official C# quickstartBlog 3Setting up Anton Tishchenko’s community Sitecore MCP server for XP with VSCode and CopilotBlog 4Building a custom .NET MCP server tailored to real Sitecore project reporting needs

If you are a .NET developer working on Sitecore and curious about where AI tooling is heading — stick around. The barrier is genuinely lower than it looks.

Till then, Happy Sitecoring! 😊

Tuesday, March 10, 2026

Auditing Sitemap Cache Configuration Across 300+ SXA Sites in Sitecore 10.4

Hello Sitecorian Community,

In large SXA implementations, operational issues rarely affect just one site. In our case, we were working on a Sitecore 10.4 SXA solution with 300+ websites, and we encountered a performance concern:

The sitemap refresh job was executing more frequently than expected.

To properly investigate the issue, we first needed visibility.

Specifically, we needed to answer:

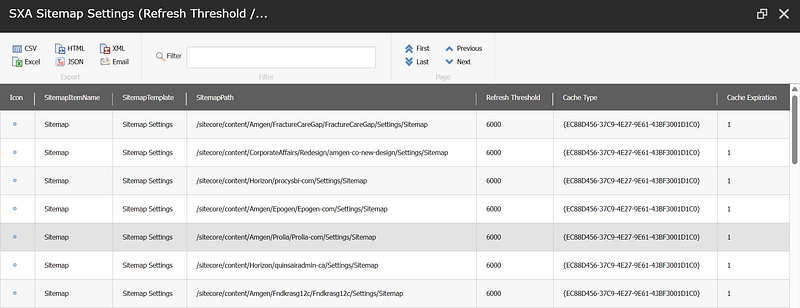
  • How many sites actually have a Sitemap item?
  • What values are configured for:
  • Refresh Threshold
  • Cache Type
  • Cache Expiration
  • Are there inconsistencies across tenants and sites?

Manually checking 300+ sites was not realistic. Automation was the only viable approach.

Understanding the SXA Structure

In SXA, the typical structure looks like this:

/sitecore/content/{Tenant}/{Tenant}/{Site}/Settings/Sitemap

The configuration fields we were interested in are stored directly on the Sitemap item under the Settings node.

The required fields:

  • Refresh Threshold
  • Cache Type
  • Cache Expiration

Our goal was to extract:

  • Sitemap item path
  • Configured values of the three fields
  • Total count of sitemap items found

Approach: Automating with Sitecore PowerShell Extensions (SPE)

Instead of writing everything from scratch, I reused an existing PowerShell script that I had previously written for deleting Flashes items in an older SXA setup.

Given that we now have powerful AI-assisted tools available, I provided the reference script to ChatGPT and adapted it to:

  • Traverse all Settings nodes
  • Locate Sitemap items
  • Extract required field values
  • Display results in a Show-ListView

This significantly reduced the time required to build a reliable audit script.

Final Working Script

# -----------------------------------------
# SXA: Read Sitemap cache settings per site
# Path pattern: .../Settings/Sitemap
# -----------------------------------------

# Fields on the Sitemap item
$fieldRefreshThreshold = "Refresh Threshold"
$fieldCacheType = "Cache Type"
$fieldCacheExpiration = "Cache Expiration"

$results = @()

# Find all "Settings" items under /sitecore/content (fast query by name)
$settingsItems = Get-Item -Path master: -Query "fast:/sitecore/content//*[@@name='Settings']"

foreach ($settings in $settingsItems) {

# Get child Sitemap item under Settings
$sitemapPath = "$($settings.Paths.FullPath)/Sitemap"
$sitemapItem = Get-Item -Path ("master:" + $sitemapPath) -ErrorAction SilentlyContinue

if ($null -ne $sitemapItem) {
$results += [pscustomobject]@{
SitemapItemName = $sitemapItem.Name
SitemapTemplate = $sitemapItem.TemplateName
SitemapPath = $sitemapItem.Paths.FullPath
"Refresh Threshold" = $sitemapItem[$fieldRefreshThreshold]
"Cache Type" = $sitemapItem[$fieldCacheType]
"Cache Expiration" = $sitemapItem[$fieldCacheExpiration]
}
}
}

# Show in list view
$results | Show-ListView `
-Title "SXA Sitemap Settings (Refresh Threshold / Cache Type / Cache Expiration)" `

-Property SitemapItemName, SitemapTemplate, SitemapPath, "Refresh Threshold", "Cache Type", "Cache Expiration"

Write-Host ""
Write-Host "Total Sitemap items found under Settings: $($results.Count)" -ForegroundColor Green

OutPut:

Why This Matters in Large SXA Implementations

In enterprise setups with hundreds of sites:

  • Configuration drift is common
  • Some sites may override defaults
  • Cache misconfiguration can lead to:
  • Excessive job executions
  • Increased publishing pressure
  • Performance degradation

Before fixing the problem, you need visibility.

Automation through SPE enables:

  • Rapid environment auditing
  • Cross-tenant configuration comparison
  • Reliable investigation at scale

Key Takeaways

  • In large multi-tenant SXA environments, manual verification does not scale.
  • Structural traversal (Settings/Sitemap) is a predictable way to audit configuration.
  • SPE is extremely powerful for operational investigations.
  • AI-assisted scripting can accelerate development when you already understand the architecture.

Conclusion

Investigating performance issues in a 300+ site SXA environment requires structured visibility and automation.

A small PowerShell audit script can save hours of manual effort and provide precise insights needed to diagnose job behavior in environments like jobs.aspx.

If you’re managing a multi-tenant SXA solution, consider building a small internal audit toolkit using SPE — it pays off quickly.

Stay tuned for more Sitecore-related articles, tips, and tricks to enhance your Sitecore experience.

Till then, happy Sitecoring! 😊

Please leave your comments or share this article if it’s useful for you!

Sunday, March 1, 2026

Understanding Sitecore Cache Behavior: Why Your PowerShell Updates Don't Appear (And How to Fix It Properly)

 Hello Sitecorian Community,

After 11 years architecting Sitecore solutions, I still see this question pop up regularly: “Why doesn’t my PowerShell script update show in the Content Editor until I clear cache?” It’s one of those things that trips up even experienced developers, especially when moving to containerized environments.

Let me walk you through what’s actually happening under the hood, and more importantly, how to handle it properly in enterprise implementations.

The Classic Scenario

You’re probably familiar with this pattern:

 $item = Get-Item "master:/sitecore/content/Home"
$item.Editing.BeginEdit()
$item["Title"] = "Updated via PowerShell"
$item.Editing.EndEdit()

Script executes clean. Database row updates. But Content Editor shows stale data. Refresh the browser — sometimes the new value appears, sometimes it doesn’t. Clear cache, everything’s suddenly correct.

If you’re scratching your head wondering why this happens, you’re thinking about Sitecore wrong. Let me explain.

Sitecore’s Memory-First Architecture

The key thing to understand: Sitecore is designed to avoid database calls at all costs. This isn’t a side effect — it’s the core architectural decision that lets Sitecore scale to millions of items.

Here’s what actually happens when Sitecore needs to retrieve an item:

First, check Item Cache: Sitecore looks for a fully constructed Sitecore.Data.Items.Item object in the Item Cache. If it’s there, return it immediately. Done. No further lookups needed.

If not in Item Cache, check Data Cache components: The Data Cache stores the raw building blocks:

  • ItemDefinition (ID, name, template ID, parent ID)
  • FieldList (which fields exist for this item)
  • Individual field values

If these components exist, Sitecore reconstructs the Item object from them, caches it in Item Cache, and returns it.

Finally, query the database: If the Data Cache doesn’t have what’s needed, Sitecore hits the [Items], [SharedFields], [UnversionedFields], and [VersionedFields] tables, loads the data, populates both Data Cache and Item Cache, then returns the item.

When you update an item via PowerShell, you’re writing directly to those database tables. But you’re not touching Item Cache or Data Cache. Your PowerShell script bypasses the entire ItemProvider event pipeline. No item:saved event fires. No cache invalidation events propagate. The EventQueue table doesn’t get new records. From Sitecore’s perspective, nothing changed.

The Multi-Cache Problem

This is where it gets interesting architecturally. Sitecore doesn’t have a single monolithic cache — it has multiple specialized caches that work together:

Item Cache: Stores complete Item objects (includes all fields, versions, language data)

Data Cache: Stores the raw components used to build items:

  • ItemDefinition objects
  • FieldList objects
  • Individual field values

StandardValues Cache: Stores template field default values (consulted when an item doesn’t have its own value for a field)

Path Cache: Maps item paths to GUIDs for fast lookups

AccessResult Cache: Stores security filtering results

Registry Cache: Configuration and settings

Here’s the problem: after a PowerShell update, you might have:

  • Item Cache: Contains old Item object with stale field values
  • Data Cache: Still has old field value entries
  • Path Cache: Correct (maps path to ID, which didn’t change)
  • Database: Has new values

When Sitecore retrieves your item, depending on cache state, you get inconsistent results. Two requests for the same item can return different data based on whether they hit Item Cache or rebuild from Data Cache or query the database.

I’ve debugged this with dotTrace profiler, and watching the cache hit patterns is fascinating. Here’s what actually happens:

// Request 1: Gets served from Item Cache
var item1 = Sitecore.Context.Database.GetItem(itemId);
// Returns cached Item object with old "Title" value
// Request 2: Item Cache entry was evicted, rebuilds from Data Cache
var item2 = Sitecore.Context.Database.GetItem(itemId);
// Rebuilds Item from field data, still sees old cached field values
// Request 3: Data Cache entries also evicted, hits database
var item3 = Sitecore.Context.Database.GetItem(itemId);
// Finally sees new value from database, then caches it

Why Docker Amplifies This

In traditional deployments, you might not notice this much. In containerized environments, it becomes painfully obvious. Here’s why:

Memory pressure: Containers typically run with 2–4GB RAM allocations versus 32GB+ on VMs. Cache eviction happens constantly.

Isolated process spaces: Each container has completely independent memory. CM and CD don’t share anything. In Kubernetes, you might have 3 CD replicas — each with its own cache state showing different versions of your content.

Frequent restarts: During development, containers restart constantly. Every restart = cold cache = more visible inconsistency.

No distributed cache by default: Unless you’ve implemented Redis or another distributed cache, each container is an island.

I’ve architected several Kubernetes-based Sitecore implementations, and this is where developers get bitten hard. They’ll make a PowerShell update on CM, publish it, then hit different CD pods and see different content. It’s not a bug — it’s architecture.

What Actually Happens in the UI

When you edit through Content Editor or Experience Editor, Sitecore triggers the full save pipeline through its event system. The item:saved event fires and propagates through multiple registered handlers that:

  1. Remove the item from Item Cache
  2. Clear Data Cache entries for that item ID
  3. Trigger StandardValues Cache clearing if it’s a template
  4. Add entries to the EventQueue table for remote cache invalidation across CM instances
  5. Update link database and search indexes
  6. Fire any custom event handlers you’ve registered

PowerShell’s BeginEdit()/EndEdit() methods skip all of this. They call directly into Sitecore.Data.DataProviders and write to the database. Fast, efficient, but completely bypasses the event pipeline — which means no automatic cache invalidation.

This is by design. PowerShell gives you low-level data access for performance. The trade-off is you’re responsible for cache management yourself.

Why Auto-Clearing Would Break Everything

Some developers ask: “Why doesn’t Sitecore just clear cache after every script operation?”

Think about the implications. I recently wrote a migration script that updated 50,000 items. If Sitecore cleared cache after each operation:

  • 50,000 cache clear operations
  • 50,000 cache rebuild operations on next access
  • Memory thrashing from constant allocations/deallocations
  • GC pressure from all that object churn
  • Potential OutOfMemoryException on large operations

On a production instance with millions of items, this would tank performance. Bulk operations would become impossibly slow. Memory usage would spike uncontrollably.

Sitecore’s design choice: give architects control. Want aggressive cache clearing? Do it. Want to batch updates and clear once? Do that. Want selective clearing? You got it.

The Pattern I Actually Use Now

After years of getting burned by this, here’s how I write PowerShell scripts now:

# Keep track of what I touched
$affectedItems = @()
# Do the actual updates
$items = Get - ChildItem "master:/sitecore/content/Home" - Recurse
foreach($item in $items) {
if ($item["Title"] - eq "OldValue") {
$item.Editing.BeginEdit()
$item["Title"] = "NewValue"
$item.Editing.EndEdit()
$affectedItems += $item
}
}
# Clear ONLY the items I changed
foreach($item in $affectedItems) {
[Sitecore.Data.Caching.CacheManager]::GetItemCache($item.Database).RemoveItem($item.ID)
}
# Publish to CD
foreach($item in $affectedItems) {
Publish - Item - Item $item - Target "web" - PublishMode Smart - Recurse: $false
}


This is way better than nuking all caches. You’re surgically removing just the stuff you changed. The rest of the cache stays intact, site stays fast, everyone’s happy.

Note: In most cases, clearing ItemCache alone is sufficient. DataCache entries are secondary and typically rebuild automatically. If you need more thorough cache clearing, you can add DataCache key pattern matching, but it’s rarely necessary for typical content updates.

Stuff That’s Saved Me Hours of Debugging

A few tricks I’ve picked up over the years:

Watch the EventQueue table: If you’re running multiple CMs (like in Kubernetes), check your Core database’s EventQueue table. I’ve seen situations where events just stop propagating between instances. Cache invalidation events pile up, never get processed, and suddenly different CMs show different content.

Turn on cache logging during dev: Just temporarily, because it’s chatty. But seeing exactly what’s getting cached and cleared makes everything make sense.

Use the Sitecore diagnostics tools: There’s a Support Diagnostics module that shows you what’s in cache right now. It’s like X-ray vision for understanding what’s happening.

Check Application Insights: On newer Sitecore versions, you can actually see cache hit/miss ratios. If your hit ratio is low, something’s wrong with your cache strategy.

The Publishing Thing Nobody Mentions

Here’s something that bit me hard when we went headless: clearing CM cache means nothing to your CD instances until you publish.

In the old days, some devs (not me, I swear) would point CD at the master database. Terrible practice, but it meant updates showed up everywhere immediately. In a proper architecture with separate CM/CD? Publishing isn’t optional.

And Publishing Service has its own cache quirks too. I’ve seen situations where the publishing job queue gets backed up, and suddenly your CD is minutes behind CM even though you’re publishing. Fun times.

What I Wish Someone Had Told Me Years Ago

Look, after writing probably hundreds of PowerShell scripts for Sitecore — migrations, bulk updates, automated content fixes — here’s what I’ve learned:

PowerShell changes the database, not the cache. You’re reaching under Sitecore’s hood and modifying data directly. Sitecore doesn’t know you did that unless you tell it.

Cache clearing isn’t overhead, it’s part of the job. Budget for it. Plan for it. Do it.

In real architectures, you HAVE to publish. Don’t rely on CM and CD magically staying in sync. They won’t.

Clear what you actually changed. Don’t be lazy and nuke everything unless you really need to.

Test in realistic environments. If your dev environment has unlimited memory and production doesn’t, you won’t see cache issues until it’s too late.

Once I stopped thinking of Sitecore like a traditional CMS and started understanding it’s really a memory-first system that happens to persist to a database, everything clicked. The cache isn’t misbehaving — it’s doing exactly what it’s supposed to. You just need to work with it.

These days, when a junior dev comes to me saying “my PowerShell script isn’t working,” I already know what they forgot. We all learn this lesson eventually. Hopefully, this helps you learn it a bit faster than I did.

Stay tuned for more Sitecore-related articles, tips, and tricks to enhance your Sitecore experience.

Till then, happy Sitecoring! 😊

Please leave your comments or share this article if it’s useful for you!
Wednesday, November 26, 2025

Bulk User Creation in Sitecore with Predefined Roles Using PowerShell (Inline Data - No CSV Needed)

 Hello Sitecorian Community! 👋

User onboarding is a routine task for any Sitecore administrator — but when the list grows beyond a handful of users, things start becoming slow, repetitive, and error-prone. A few days ago, I faced exactly this challenge while onboarding multiple content authors and admins across different departments.

Creating users manually via User Manager?

✔ Works

❌ Doesn’t scale

❌ Prone to mistakes

❌ Takes too much time

I wanted a clean automation approach — something quick, reliable, and without depending on CSV uploads, especially since many enterprises don’t allow file-based imports for security reasons.

So like always, PowerShell + SPE came to the rescue!

Let’s walk through the challenge and how I solved it.

Why Automate User Creation in Sitecore?

If you’ve ever created multiple users manually, you already know the pain:

  • Typing usernames and emails
  • Setting passwords
  • Assigning multiple roles
  • Making sure profile fields are correct
  • Repeating it for every single user

And just one mistake can lead to:

  • Wrong access levels
  • Incorrect roles
  • Broken workflows
  • Inconsistent naming

Automation helps you:

  • Save time
  • Maintain consistency
  • Avoid human errors
  • Create 10, 20, or 100 users in seconds
  • Ensure each user gets the correct predefined roles

Inline Data — No CSV, No External Dependency

In some organizations, importing CSV files is restricted due to compliance/security.

So I built this script to use inline PowerShell hashtables where user details are defined right inside the script.

It’s:

  • Self-contained
  • Easy to maintain
  • Easy to update
  • Perfect for DevOps teams
  • Ideal for one-time admin runs

Just open SPE → Paste the script → Run it.

PowerShell Script (Inline Users + Predefined Roles)

🔗 Script link placeholder (add your GitHub link):

https://github.com/gaurarun777/SitecorePowerShell/blob/main/Sitecore-BulkUserCreation.ps1

How This Script Helps

1. Faster Onboarding

Create 5, 50, or even 500 users in seconds — no repetitive clicking.

2. Guaranteed Consistency

Each user gets:

  • Correct roles
  • Correct password
  • Correct profile fields

Every time.

3. No CSV Upload Needed

All data sits inside the script.

Perfect for environments with strict security rules.

4. Human Errors Eliminated

No accidental typos.

No missed roles.

No duplicate users.

5. Reusable for Future Teams

Just update the user array and reuse the script anytime.

Conclusion

Bulk user creation doesn’t need to be painful.

With a simple PowerShell script and inline data, you can automate user onboarding in minutes — without relying on CSV files or manual entry.

This approach has already saved us hours of admin effort and ensures accuracy every single time.

I hope you enjoy this blog. Stay tuned for more Sitecore-related articles, tips, and tricks to enhance your Sitecore experience.

Till then, happy Sitecoring! 😊

Please leave your comments or share this article if it’s useful for you!
Automating Access Control in Sitecore: Granting, Revoking, or Denying Permissions on Multiple Nodes


Hello Sitecorian Community! 👋

If you’re managing a large Sitecore environment, you know the drill — setting permissions across hundreds (or even thousands) of content items can be incredibly time-consuming and prone to errors. Imagine having to manually update permissions for each item — it’s a tedious, repetitive task that steals valuable time and increases the risk of mistakes. And when something goes wrong, it can have serious security implications.

So, how do you automate this process? How can you ensure consistency, eliminate human error, and manage permissions at scale? Well, I’ve got a solution for you! In this blog post, I’ll walk you through a PowerShell script that makes managing permissions across multiple items a breeze.

The Problem: Manual Permissions Management in Sitecore

Managing user access and permissions is a key part of maintaining a secure Sitecore environment. But as your Sitecore instance grows, it can feel like you’re drowning in a sea of permission settings. Here’s why:

  • Granting Permissions: You need to make sure the right people or roles have access to the right content.
  • Revoking Permissions: When someone leaves a project or role, you must manually remove their access to sensitive content.
  • Denying Permissions: Sometimes, you need to deny access to specific roles, even overriding inheritance rules.

When you’re dealing with hundreds of content items, making these adjustments manually can become a nightmare.

Not to mention, a single mistake can lead to unauthorized access, potential data leaks, or just plain frustration. So, how can we fix this?

The Solution: Automating Access Control with PowerShell

Here’s where automation shines! By using PowerShell, we can automate the process of granting, revoking, and denying permissions for multiple items at once. This saves you a lot of time, reduces the risk of human error, and ensures consistent permissions across your Sitecore environment.

In this post, I’ll walk you through how the script works and how you can use it in your own Sitecore instance.

How the PowerShell Script Solves the Problem

The script works by applying permissions to multiple content items in a single operation. Whether you’re granting, revoking, or denying permissions, the script automates all of it with minimal input. Here’s how it addresses each of the challenges:

  1. Granting Permissions:
  • You can quickly assign read, write, delete, and other rights to a specific role for multiple nodes.
  • This can be done for all items in a folder, or even across the entire Sitecore tree.
  1. Revoking Permissions:
  • The script removes any explicit “Allow” or “Deny” permissions from items, making sure that old permissions don’t stick around longer than needed.
  1. Denying Permissions:
  • You can explicitly deny access, even overriding inheritance (which would normally propagate permissions from parent items).
  1. Database Flexibility:
  • The script allows you to select the Sitecore database (master, web, core) you want to work with, making it adaptable for different environments (e.g., live, staging).
  1. Inheritance Management:
  • You can control whether child items inherit permissions from their parent items or whether you want to break that inheritance and set custom permissions.

Key Features of the Script:

  • Grant, revoke, or deny permissions on multiple items.
  • Select the database (master, web, core) for changes.
  • Control inheritance for child items.
  • An interactive dialog for setting parameters (no need to modify the script every time).

The PowerShell Script: Let’s Take a Look

https://github.com/gaurarun777/SitecorePowerShell/blob/main/Sitecore-AccessControl-Automation.ps1

How to Use the Script

  1. Customize the Parameters:
  • Choose the database (master, web, core) where you want the changes to be applied.
  • Enter the role for which you want to set permissions.
  • Specify the item paths (one per line).
  • Select the permissions (Read, Write, Delete, etc.) and choose whether you want to grant, revoke, or deny them.
  1. Run the Script:
  • Execute the script in a PowerShell environment connected to your Sitecore instance. You’ll need administrative privileges to apply changes.
  1. Verify the Changes:
  • After running the script, verify that the permissions were updated as expected by checking the Access Control tab in Sitecore for the affected items.


Conclusion

Managing permissions across a large Sitecore instance no longer has to be a nightmare. With this PowerShell script, you can grant, revoke, or deny permissions in bulk — saving time, reducing the risk of errors, and maintaining consistency across your Sitecore environment.

Stay tuned for more Sitecore-related articles, tips, and tricks to enhance your Sitecore experience.

Till then, happy Sitecoring! 😊

Please leave your comments or share this article if it’s useful for you!


Tuesday, July 29, 2025

🔧 Supercharge Your Sitecore Admin Workflow: PowerShell Scripts for Efficient User Management

Hi All,

Managing users in a large Sitecore environment can quickly become overwhelming — especially when dealing with inactive accounts, security audits, or regular maintenance. Whether you’re a Sitecore administrator or a dev lead, having a clean, secure user base is crucial.

In this blog, I’ll walk you through 4 essential PowerShell scripts that have helped my team streamline Sitecore user management and perform periodic cleanup with ease. 🧹⚙️

🚀 Why PowerShell for Sitecore?

Sitecore PowerShell Extensions (SPE) provide a powerful scripting environment to interact with Sitecore APIs directly — enabling automation, reporting, and even UI integration.

These scripts are simple, reusable, and can be scheduled or triggered on demand — helping you keep your environment healthy and compliant.

🧑‍💼 Use Case #1: List All Disabled Users from Sitecore

Inactive, disabled accounts can pile up over time. Use this script to identify all users who were disabled within the past— handy for audits or cleanup reports.

# Get all users (from all domains)
$allUsers = Get-User -Filter "*"
 
# Filter disabled users (IsEnabled = $false)
$disabledUsers = $allUsers | Where-Object { $_.IsEnabled -eq $false }
 
# Add parsed domain info for each user
$disabledUsersWithDomain = $disabledUsers | ForEach-Object {
    $splitName = $_.Name -split '\\'
    [PSCustomObject]@{
        Name      = $_.Name
        Domain    = if ($splitName.Length -eq 2) { $splitName[0] } else { "unknown" }
        UserName  = if ($splitName.Length -eq 2) { $splitName[1] } else { $_.Name }
        IsEnabled = $_.IsEnabled
    }
}
 
# Show in interactive list view
$disabledUsersWithDomain | Show-ListView -Title "Disabled Users" -Property Name, Domain, UserName, IsEnabled

✅ Benefits:

  • Audit ready
  • Easily exportable

🕵️ Use Case #2: Find Users Who Haven’t Logged In for 6+ Months

This one’s gold for spring cleaning your user base. It checks the LastLogin date and lists users who haven’t logged in since the specified threshold.

Script 1:

Add-Type -AssemblyName "System.Web"
 
# Set the cutoff date (6 months ago)
$cutoffDate = (Get-Date).AddMonths(-6)
 
# Get all Sitecore users
$allUsers = Get-User -Filter *
 
# Create a list of inactive users
$inactiveUsers = @()
 
foreach ($sitecoreUser in $allUsers) {
    $userName = $sitecoreUser.Name
 
    # Get Membership user for accurate LastLoginDate
    $membershipUser = [System.Web.Security.Membership]::GetUser($userName, $false)
 
    # Skip if membership user doesn't exist
    if ($membershipUser -eq $null) {
        continue
    }
 
    $lastLogin = $membershipUser.LastLoginDate
 
    if ($lastLogin -eq $null -or $lastLogin -lt $cutoffDate) {
        $inactiveUsers += [PSCustomObject]@{
            Username   = $sitecoreUser.Name
            FullName   = $sitecoreUser.Profile.FullName
            Email      = $sitecoreUser.Profile.Email
            LastLogin  = if ($lastLogin) { $lastLogin } else { "Never Logged In" }
        }
    }
}
 
# Show the list
$inactiveUsers | Sort-Object LastLogin | Show-ListView -Title "Users Not Logged In in Last 6 Months (Accurate)" -Property Username, FullName, Email, LastLogin

Script 2:

Add-Type -AssemblyName "System.Web"
 
# Get the membership provider (adjust provider name if custom)
$provider = [System.Web.Security.Membership]::Provider
 
# Set cutoff date to 6 months ago
$cutoffDate = (Get-Date).AddMonths(-6)
 
# Prepare list for inactive users
$inactiveUsers = @()
 
# Paging parameters
$pageSize = 1000
$pageIndex = 0
$totalRecords = 0
 
do {
    # Retrieve a page of users
    $usersPage = $provider.GetAllUsers($pageIndex, $pageSize, [ref]$totalRecords)
 
    foreach ($user in $usersPage) {
        # Get LastLoginDate from membership user
        $lastLoginDate = $user.LastLoginDate
 
        if ($lastLoginDate -eq $null -or $lastLoginDate -lt $cutoffDate) {
            # Try to get Sitecore user for profile info
            $sitecoreUser = Get-User -Identity $user.UserName -ErrorAction SilentlyContinue
 
            $inactiveUsers += [PSCustomObject]@{
                "Username"  = if ($sitecoreUser) { $sitecoreUser.Name } else { $user.UserName }
                "FullName"  = if ($sitecoreUser) { $sitecoreUser.Profile.FullName } else { "" }
                "Email"     = if ($sitecoreUser) { $sitecoreUser.Profile.Email } else { "" }
                "LastLogin" = if ($lastLoginDate) { $lastLoginDate } else { "Never Logged In" }
            }
        }
    }
 
    $pageIndex++
} while ($pageIndex * $pageSize -lt $totalRecords)
 
# Output the inactive users sorted by last login date
$inactiveUsers | Sort-Object LastLogin | Show-ListView -Title "Users Not Logged In Last 6 Months" -Property Username, FullName, Email, LastLogin
💡 Pro Tip: You can combine this with your organizational offboarding process to auto-disable accounts.

❌ Use Case #3: Disable List of Users in Bulk

Need to quickly disable multiple users? Paste a list of usernames and run this batch disable script.

# Prompt for comma-separated list (e.g., amgen\pia,sitecore\admin)
$userList = Read-Host "Enter comma-separated list of usernames or fully qualified usernames to disable"
 
# Split and clean the input
$userNames = $userList -split ',' | ForEach-Object { $_.Trim() }
 
foreach ($userName in $userNames) {
    if ([string]::IsNullOrWhiteSpace($userName)) {
        Write-Host "⚠️ Skipped empty username entry." -ForegroundColor DarkYellow
        continue
    }
 
    # Check if user exists
    $user = Get-User -Identity $userName -ErrorAction SilentlyContinue
 
    if ($user -ne $null) {
        if ($user.IsEnabled) {
            try {
                Disable-User -Identity $userName
                Write-Host "✅ Disabled: $userName" -ForegroundColor Green
            } catch {
                Write-Host "❌ Failed to disable $userName — $($_.Exception.Message)" -ForegroundColor Red
            }
        } else {
            Write-Host "ℹ️ Already disabled: $userName" -ForegroundColor Yellow
        }
    } else {
        Write-Host "❌ User not found: $userName" -ForegroundColor Red
    }
}

🧠 Use Cases:

  • Security lockdowns
  • Role changes
  • Temporary suspension

✅ Use Case #4: Enable List of Users in Bulk

Just like disabling, enabling a list of users is just as straightforward.

# Prompt for comma-separated list (e.g., amgen\pia,sitecore\admin)
$userList = Read-Host "Enter comma-separated list of usernames or fully qualified usernames to enable"
 
# Split and clean the input
$userNames = $userList -split ',' | ForEach-Object { $_.Trim() }
 
foreach ($userName in $userNames) {
    if ([string]::IsNullOrWhiteSpace($userName)) {
        Write-Host "⚠️ Skipped empty username entry." -ForegroundColor DarkYellow
        continue
    }
 
    # Check if user exists
    $user = Get-User -Identity $userName -ErrorAction SilentlyContinue
 
    if ($user -ne $null) {
        if (-not $user.IsEnabled) {
            try {
                Enable-User -Identity $userName
                Write-Host "✅ Enabled: $userName" -ForegroundColor Green
            } catch {
                Write-Host "❌ Failed to enable $userName — $($_.Exception.Message)" -ForegroundColor Red
            }
        } else {
            Write-Host "ℹ️ Already enabled: $userName" -ForegroundColor Yellow
        }
    } else {
        Write-Host "❌ User not found: $userName" -ForegroundColor Red
    }
}

🚀 Ideal for:

  • Reinstating users post-project
  • Bulk onboarding
  • Re-enabling after audits

🗂️ Optional: Exporting to CSV

You can export results of any of the above scripts for record-keeping:

$inactiveUsers | Export-Csv -Path "C:\SitecoreReports\InactiveUsers.csv" -NoTypeInformation

🔄 Bonus Tip: Automate It!

You can schedule these scripts via Task Scheduler or integrate into a custom Sitecore SPE Job for automation. This ensures your environment stays tidy without manual intervention.

🧭 Wrapping Up

Sitecore user management doesn’t have to be tedious. With these PowerShell scripts:

✅ You save time
 ✅ Reduce risk
 ✅ Improve governance
 ✅ Keep your environment secure

🔐 Whether you’re prepping for an audit, onboarding a team, or cleaning up dormant accounts — PowerShell is your best friend.

📌 Have your own PowerShell tips or scripts for Sitecore? Drop them in the comments or connect with me on LinkedIn. Let’s make Sitecore management smarter — together!

References:

https://github.com/gaurarun777/SitecorePowerShell/blob/main/SitecoreEnableListOfUsers.ps1

https://github.com/gaurarun777/SitecorePowerShell/blob/main/SitecoreDisableListOfUsers.ps1

https://github.com/gaurarun777/SitecorePowerShell/blob/main/SitecoreInactiveUsersfrom6months.ps1

https://github.com/gaurarun777/SitecorePowerShell/blob/main/SitecoreInactiveUsersfrom6months_1.ps1

https://github.com/gaurarun777/SitecorePowerShell/blob/main/SitecoreListAlldisabledusers.ps1

I hope you enjoy this Sitecore blog. Stay tuned for more Sitecore related articles.

Till that happy Sitecoring :)

Please leave your comments or share this article if it’s useful for you.